• Home
  • Gathering AK Cafe Menu
  • Store
  • Newscast Blog
  • Tips and Tricks
  • BBQ4Wounded
  • About
  • Contact
  • Kudo’s

How to Get the Perfect Coleslaw for Your Cookout

January 28, 2020 By Boucanier

Written by Derrick Riches

Updated 11/05/19

Everything Slaw
haoling / Getty Images

The coleslaw was most likely brought to the United States by Dutch emigrants well over one hundred years ago. Cabbage had been brought from Europe a hundred years before that. Coleslaw became popular in the early 1900s with the advent of mayonnaise in a jar. Today, coleslaw is one of the most popular salads around and one of the top side dishes of barbecue.

Most traditional coleslaw is not made with mayonnaise but that’s the most popular form today. The combination of coleslaw and barbecue goes back a long time. Traditional Carolina style barbecue sandwiches are typically topped with shredded cabbage or coleslaw.

Making Coleslaw

The real secret to coleslaw is to remember that this is basically a cabbage salad (that’s actually where the word comes from). You don’t want coleslaw that needs to be served in a bowl. Coleslaw shouldn’t be a runny mess that soaks through your paper plate. The problem many people have is that they shred the cabbage too fine. Cabbage tends to be pretty low in water, but if you run it through a food processor you’re going to get a wet, drippy mess. Cabbage for Coleslaw should be chopped with a sharp knife and kept coarse enough that the water stays in the cabbage. Don’t grind your slaw into a soup.

The next point is to only add similarly dry vegetables to your coleslaw. Tomatoes, citrus fruits, avocados, and other mushy, wet vegetables need to stay out. Carrots, onions, celery and similar veggies are great. As for the dressing, remember that it is a dressing and not the primary ingredient of coleslaw. No matter what you mix together to dress your slaw it needs to be used in moderation. This means just enough to coat it and not drown the coleslaw. You can use most anything for your dressing including mayonnaise, vinegar, fruit juices, and oils.

Lastly, you need to season your coleslaw. Traditionally, people tend to use black pepper, salt and some herbs and spices. Caraway seeds, sesame seeds, red pepper flakes (if you want some heat), fennel, garlic, parsley, dill, oregano, and basil are all used in Coleslaw. Remember that you will want plenty of flavors because you don’t really want the taste of the cabbage to be all you get.

Once you have chopped the cabbage, the other vegetables, and the dressing ready, all you have to do is mix it together. The thing that makes Cole slaw different from other salads is that you want to mix it all together ahead of time. Coleslaw is best if it has had an hour or two in the refrigerator for the flavors to combine.

Now there are a lot of recipes out there so if you’re picky about your coleslaw I’m sure you can find the right recipe for you.

Filed Under: BBQ Sides Tagged With: BBQ, Coleslaw, Sides

What You Need to Know About German Barbecue

January 27, 2020 By Boucanier

By Derrick Riches 

Updated 01/06/20

Brisket
 Sam Bloomberg-Rissman / Getty Imags

For many people, German food often conjures up images of sauerkraut and boiled pork roasts rather than barbecue. However, like most cooking traditions, German cuisine began long ago on an open flame. One of their greatest contributions to the world includes smoked and grilled sausages. Sure, the Germans didn't invent sausage, but when we talk about Germany, we have to at least mention it.

Immigrant Influence

If you fly into San Antonio and take your rental car north about 20 minutes (depending on traffic, of course), you will find the little town of New Braunfels. This is a German-inspired town. In the early days of the Republic, Sam Houston needed a source of people for his new country, so he appealed to German immigrants. These immigrants began settling throughout Texas preserving most of their culture, resulting in German-style cooking within Texas.

Brisket

Most importantly, the Germans brought us brisket. The Brisket was considered a worthless cut of meat in the United States and usually ground up for chili or stew. The old German tradition placed tough brisket in a Dutch oven to cook low and slow until tender. It wasn't until the 1950s when a couple of German butchers put a brisket in a smoker to make modern Texas Barbecue.

The great thing about ordering food in restaurants in New Braunfels and Fredericksburg is that you can get a plate of BBQ ribs, German sausage, potato salad, and baked beans without knowing which is Texan and which is German. Fredericksburg (west of Austin by 100 miles or so), used to be a German-speaking town. Now, with the exception of a few German cultural festivals, these places are all American.

Potato Salad

In addition to sausage, Germans have always had a strong liking for potato salad. Though true German potato salad is very different from what most Americans think potato salad should be. It is an important side dish to barbecue, much like coleslaw and beer. Beer and Germany. Could there be a connection?

Smoked sausage, potato salad, beer and coleslaw all have strong roots in German culture. So, next time you lift a rack of ribs off the grill and lift a dark and bitter beer to your lips, think of the brave explorers of the American frontier who ventured to Texas with an invite from Sam Houston.

Filed Under: Historical Cooking Tagged With: BBQ, BRISKET, Smoker

No Room For Mis-Steaks

January 15, 2020 By Boucanier

The Ultimate Guide To Grilling The Perfect Steak

  • Bill Andrews
  • October 10, 2019

Is there anything better than a perfectly grilled steak? There is something about an open flame that brings out the best from your favorite cut of meat. But it can be a little daunting when trying to do it yourself.

Most professionals agree a great cut of meat is essential when learning how to grill the perfect steak. But what else goes into getting it right each and every time? Thankfully, there are a few tips and tricks to help you get the steak of your dreams whenever you fire up your grill.

Getting To Know The Grades Of Meat

Not all meat is created equal. In fact, the USDA has come up with a grading scale to help people understand the meat they are getting and how to prepare it.

There are three basic grades of meat sold in the US:

Select, Choice, and Prime.

They are ranked according to the flavor, tenderness, and juiciness of the cut. This can be determined by the amount of marbling present in the meat.

Select is the poorest quality of the three. It is slightly above what the USDA qualifies as edible. It is almost always what is on sale or advertised, so don’t be surprised if it isn’t high quality as it tends to be rather lean and without much marbling.

While some Select cuts may be cooked with dry heat or grilled, without any marinating, this is not suggested.

Choice is a great cut of beef but has less marbling than Prime. Don’t worry though. If you purchase a choice cut of beef, you will still be getting a quality steak and it should be delicious when grilled if not overcooked.

However, when it comes to grilling, you really want a cut of Prime meat. All of the juice from the fat helps to create that butter-like quality to the taste and texture.

So, when shopping, stick to either Choice or Prime cuts. They will be worth the extra money per pound you will pay. And it is easier to make sure you grill it to your tastes with better cuts of meat.

However, it is important to note finding Prime beef at your grocery store may be difficult at the best of times. So, if you have your heart set on that perfect steakhouse steak at home, be prepared to shop around. Our best suggestion is to check with local butchers in your area and if you still can’t find it, you may need to settle for a nicely aged choice cut instead.

Best Cuts For Grilling

Filet Mignon

This small, thick cut of meat is known for its buttery texture. Its name literally translates to cute filet. It is a leaner cut of meat, still tasty and generally more expensive than some of the other cuts on this list.

T-Bone

This cut of meat gets its name from its distinct shape; it looks like the letter t. It is basically two steaks in one, with a bone running done the middle of the cut. Known for its taste and texture, it is what most people think of when they think of steak.

Porterhouse

This is cut is like a T-bone’s big brother. It is another two steaks in one and is HUGE. It tends to be used in eating challenges due to its large size.

Rib Eye

This cut of beef has a nice ratio of meat to fat, so it has a great flavor to it. It is also known for being easier to cook than some of the others on this list. So, it is great for learning how to grill the perfect steak.

New York Strip

This boneless cut of meat is known for being tender and having a good meaty flavor when done correctly. It may also be called a Kansas City steak or a Delmonico steak.

Skirt Steak

This is a thin but still flavorful cut of meat. It is on the lean side, so it helps to marinate it a little before grilling.

Hanger

Another thin but beefy flavor cut of meat. Thanks to its looser muscle fibers it is another cut that is good for marinating, as it will soak up a ton of the flavor.

Prepping To Grill

Before you start to grill, there are some things you are going to need.

1: A Grill

This one is a given. It doesn’t matter if it is a charcoal or gas grill, as long as you are comfortable with it.

2: A Digital Instant Read Thermometer

We will go more into this later. But make sure you have an accurate instant-read meat thermometer. And make sure it is digital.

3: Grilling Tongs

These will make sure you don’t accidentally puncture your steak when turning it.

4: Make Sure Your Grill Has 2 Temperature Zones

Two temperature zones will make sure you can grill your steak at the right temperature. But more on that later.

Grilling Your Steak

You may have read for a perfect medium-rare steak to grill it 3-5 minutes on each side. However, this is just a sort of rough estimate.

Because no two grills, cooking surfaces, or pieces of meat are the same you will need to get familiar with how the steak feels before it is introduced to any heat. This is because the texture and density of the meat will change as it cooks.

So, to help ensure you cook your steak just the way you like it, you should spend some time getting to know what your cut of beef feels like before it is ever introduced to a flame.

Raw steak will be soft to the touch. There will be little to no resistance when you push on it. As it cooks the resistance will increase and the meat will get tougher to the touch.

For example:

A rare steak is still pretty fleshy when you touch it. Imagine poking yourself in the cheek.

Medium rare is a little tougher, like poking your chin.

Medium well is pretty tough, like poking your forehead.

Well done has almost no give at all.

There are those who say that to make sure you still get a little bit of the flavor from the meat you really shouldn’t cook it past medium-well. However, you should obviously cook your meat the way you like it.

Somethings NOT To Do When Grilling A Steak

1: Cook Meat Straight From The Fridge

Many professional chefs think to let your steak get to room temperature before you start to cook it helps it to cook evenly. Most suggest leaving it on a prep rack for an hour should do the trick, So, use this time to salt or season your meat.

2: Don’t Use The Wrong Salt

That’s right. There is a right and wrong salt to use when prepping your steak. It turns out table salt or any other fine-grained salt is going to have too much weight per volume and you will run the risk of over seasoning.

Instead, use something like sea salt or kosher salt. Both have a nice medium to large grain which will give it a nice taste without being too overpowering.

3: Don’t Season Too Soon

If you don’t have at least an hour or so to season your steak, it is best to leave it until right before it goes on the grill. This is to make sure you can get that beautiful and tasty crust on your steak.

4: Don’t Start If Your Grill Isn’t Super Hot

The flames will need to be going for at least 20-30 minutes before you even think about starting to grill. This is to make sure you sear the outside and lock all the flavor in.

5: Make Sure You Have A Meat Thermometer

Yes, we know we did just tell you to check the fleshiness of your meat with your finger. However, unless you are a total pro, it is still better to use a meat thermometer to check the temperature. Here is a helpful table:

Rare: 120-130°F

Medium rare: 130-135°F

Medium: 140-145°F

Medium Well: 150-155°F

Well: 160-165°F

6: Flipping Your Steak More Than Once

Flipping your steak more than once can actually make it lose some of its flavors. Simply turn it once on each side to get the lovely criss-cross grill marks and then flip it once.

7: Don’t Forget To Let It Rest

Meat doesn’t stop cooking once it is off the grill. By letting it rest a little before serving it, you give your steak the perfect chance to finish cooking and let the juices settle.

Many experts suggest pulling the meat off the grill when it is about 10 degrees cooler than your desired temperature and then let it rest in a warm place (you don’t want a cold steak) for about half the time you cooked it. And if you want it hot, then just pop it back on the grill for a little warm-up and you should be good to go.

8: Do NOT Cut Or Puncture It To Check If It’s Done

Cutting into a piece of meat to check its readiness is just going to let all of the juices out of the steak. This means it will dry out the meat and cause it to lose flavor.

This is where the digital instant-read thermometer comes in. It will let you check the internal temperature of your steak without having to puncture it. Every grilling enthusiast should have one.

Now To The Grilling

Cooking Thin Cuts

When cooking thin cuts of meat, like a skirt or hanger, make sure you cook it directly over the hottest part of the grill. This will ensure it is cooked evenly throughout. Just remember to take it off the heat a little early and let it rest before serving.

Cooking Thick Cuts

This is where the two temperature zones on your grill are needed. The cooler zone on your grill is only going to need to be about 225 degrees.

So, first, you are going to put your steak in this cooler part of the grill and cover it with the lid. This will help circulate hot air around your meat, making sure it is heated evenly on both the top and the bottom. Think of it like creating a little mini oven.

Start checking the temperature after about 15 minutes. If it isn’t at the desired temperature, check again in five minutes and so on until it is about 10 degrees lower than the desired temperature. So, if you want a medium-rare steak, it would need to be about 125 at this point.

Once it hits that number, you'll want take it off the grill for a second so you can crank the heat up and get it ready to really cook. For gas grills, close the lid and turn up all the burners. For charcoal grills, gather into a pile or add half a chimney’s worth of fresh coals to the mix.

Now that everything is all heated up, put your steak in the direct heat zone and flip it once to make sure it is properly browned evenly on both sides. Be sure to take it off the grill once it hits the lower temperature of how well you want it done and let it rest.

How To Grill A Perfect Steak

It can be tricky grilling the perfect steak. However, with these helpful guidelines on what to do and what not to do, you should be able to up your steak game and wow everyone at your next outdoor event.

For more helpful hints on how to get perfectly grilled meat or vegetables, check out the rest of our outdoor section.

Share on facebook
Share on twitter
Share on pinterest
Share on email
Share on print

Bill Andrews

PrevPREVIOUSHow to Roast Asparagus In The Oven
NEXT5 Stand Mixer Attachments Every Home Cook NeedsNext

Filed Under: Grilling Tagged With: grilling, Meats, Steaks

About the Art of Living

January 13, 2020 By Boucanier Leave a Comment

What Anthony Bourdain Taught us About the Art of Living

Lauren MacNeish

Lauren MacNeish

Aug 13, 2018 · 5 min read

Photo: Laurie Woolever/Grub Street

When Anthony Bourdain’s name was trending on June 8th, the last thing I expected to see was news of his death. It hit like a punch to the gut. I’ve been following Bourdain’s travels for years. It seems insignificant to say that he merely wrote about food and travel; he wasn’t just a celebrity chef or a travelling food writer. To say that Anthony Bourdain was a ‘good writer’ would be the greatest disservice to a man that made food and travel writing kinetic and gave no time to the usual artifice of television and travel writing. When he famously said to the New Yorker in 2017, “I travel around the world, eat a lot of shit, and basically do what the fuck I want”, this was a classic Bourdain understatement.

“Without new ideas success can become stale.”

His dark humour and caustic wit allowed him to captivate the minds of those that listened to him or read his writings. He lived a life that he didn’t take too seriously and opened the door to the unexpected appetising spots across the world; some gritty and some beautiful. It’s an understatement to say that Bourdain was a culinary giant; he taught us life lessons in how to love, how to travel, how to eat, and how to live. I’ll miss reading about his adventures that filled me with a yearning to ‘be like Bourdain’ but will be forever grateful for the inspiration and lessons he, unknowingly, taught us. Here’s four of them…

“Your body is not a temple, it’s an amusement park. Enjoy the ride.”

This is one of my favourite quotes by Bourdain. In a world that constantly churns out negative news about how we’re living and how we should cut out this thing in favour of that thing, it was always refreshing to hear Bourdain tell us to live life to the fullest. It’s this vibrancy that fascinated me about him. I’m not sure if it was the allure of travel, food, or drink that kept me reading Bourdain, but what I do know is that I saw a guy who was doing what I dreamt of doing, with an attitude for life I wanted to have. Anthony Bourdain was an inspiration for embracing life, cutting out the shit, and doing more of the things that make us happy — is there any greater lesson than that?

“Meals make the society, hold the fabric together in lots of ways that were charming and interesting and intoxicating to me. The perfect meal, or the best meals, occur in a context that frequently has very little to do with the food itself.”

Go off the beaten track.

Bourdain once said: “Travel isn’t always pretty. It isn’t always comfortable. Sometimes it hurts, it even breaks your heart. But that’s okay. The journey changes you; it should change you. It leaves marks on your memory, on your consciousness, on your heart, and on your body. You take something with you. Hopefully, you leave something good behind.”

He was renowned for taking us off the beaten track and had a knack for making us feel like we were there with him. He led us down the streets less travelled, into the homes of waiters and busboys, and here is where the people danced, ate, played dominos, laughed, and drank.

Celebrity chefs usually take us to picturesque scenes, usually in some Italian village or the French Riviera, but Bourdain took us to those less glamourous and shone a light on them. The Congo comes to mind. It probably helped to be a male with a camera crew, but let’s not take away his gutsiness and authentic ability to show us those roads less travelled.

“If I’m an advocate for anything, it’s to move. As far as you can, as much as you can. Across the ocean, or simply across the river. The extent to which you can walk in someone else’s shoes or at least eat their food, it’s a plus for everybody. Open your mind, get up off the couch, move.”

Respect the culture.

Bourdain’s attitude of openness and eagerness to learn was infectious. He taught us, with an enthused courteousness, that — no matter where we sit in this world — we’re more alike than we are different. Wherever he was, he was impassioned to eat their food, hear their music, and see their culture through their eyes.

“You learn a lot about someone when you share a meal together.”

The ‘no assholes’ rule.

Bourdain once said: “It is truly a privilege to live by what I call the ‘no asshole’ rule. I don’t do business with assholes. I don’t care how much money they are offering me, or what project. Life is too short. Quality of life is important. I’m fortunate to collaborate with a lot of people who I respect and like, and I’d like to keep it that way.”

If you’re reading this on your dreaded morning commute or on your way home from another day at the office with the ‘assholes’, you’ll know that we don’t all have Bourdain’s ‘privilege’, as he put it. But it’s something to aspire to, isn’t it?

“Skills can be taught. Character you either have or you don’t have.”

Lessons for life.

Some of Bourdain’s lessons were stated plainly, while others were revealed less obviously. He wanted to encourage us all to learn more by slowing down and showed us that travel isn’t about living in a postcard, but an embracement of people and culture.

Tall, tattooed, quick witted, with an infectious attitude for life, Anthony Bourdain had an idiosyncratic way of sharing his love for the world. He had a way of projecting his steeliness; an invisible armour that protected him from the demands of the public eye, and — while the cruellest enemy of all is what got him in the end: the enemy within — he was the real deal. Anthony Bourdain: the benchmark of our creative outlook.

Has Anthony Bourdain inspired you in any way? I’d love your thoughts.

Keep in touch on Twitter and Instagram.

View more at: laurenmacneish.com

Filed Under: Cooking, Umami

The Perfect Dish: Babi Guling

December 24, 2019 By Boucanier Leave a Comment

Umami Media

Umami Media Follow Oct 2, 2018 · 2 min read

Babi guling (suckling pig) is possibly Bali’s signature dish, with streetside warungs (hawkers) and famous restaurants vying for the title of the island’s best joint.

Often hotly contested by lovers of the dish is where one can find the best rendition of babi guling. Connoisseurs of the dish go on road trips, visiting all the famous spots to sample all the various takes on the classic Balinese dish. From famous joints in Jimbaran packed all-day long with ravenous diners to hidden back-alley secret spots in Canggu open only in the wee hours of the dusk, the depths of a cult following that the dish inspires is mind-boggling.

A traditional Balinese dish, the pig is typically cut, cleaned and stuffed with an assortment of aromatics, the proportion and mixture of which are closely-guarded secret handed down through the generations by individual vendors. Spices commonly used include salt, pepper, garlic, ginger, galangal, chili, shallots, turmeric, coriander seeds, lemongrass, and kaffir lime leaves. Once marinated and infused with the spices, the pork is grilled over spitfire and basted till it is cooked to crisp perfection. The crackling is separated, the meat is sliced and both are portioned atop steaming hot white rice, accompanied by lawar (Balinese salad) and sambal matah (Balinese chili dip) for one’s enjoyment.

Whether one is a first-time traveler to Bali or a returning visitor, a trip to a babi guling joint is something of a mandatory checkpoint amongst other delicious offerings on the island.

DIRECTORY

Babi Guling Sanur

Jalan Bypass Ngurah Rai

Sanur, Bali, Indonesia

T: (+62) 361 2873 08

Warung Babi Guling Pak Malen

Jalan Sunset Road, №554

Seminyak, Bali, Indonesia

T: (+62) 851 0045 2968

Filed Under: Cooking, Umami Tagged With: Dish, Pig, Pork

The Science Of Cooking Prime Rib.

December 19, 2019 By Boucanier Leave a Comment

And Other Beef Roasts Recipe

By Meathead Goldwyn

Is there anything more festive, impressive, and luxurious than a big juicy beef roast? Well it’s easy to make outdoors and it definitely tastes better, but my techniques work fine indoors and for all types of beef roasts.

Our goals

Here are the benchmarks we will strive for. I will explain them in detail further down the page.

1) Maximum tenderness and juiciness. Beef roasts are at their best when cooked to 130°F to 135°F internal temp. That’s medium-rare when it is no longer purple but deep red, and not yet pink.

Placeholder

2) Even color. We want the same red color bumper to bumper with no overcooked meat beyond 1/4″ deep. We don’t want a rainbow of colors starting with a band of gray meat below the crust, then tan, then pink, and finally, in the center, just a bit of properly cooked red meat.

3) Crust. We want a lot of deep dark crunchy crust enriched by salt, herbs, and spices mixing with beef juices that are squeezed out by the heat, and dried to bark by the roasting process.

4) Easy carving. We don’t want to struggle with removing a rack of bones at tableside, we don’t want juice all over the tablecloth, and we don’t want to look more foolish than usual.

Click here to read more…

Here’s our Beef Roast recipe!

Print Recipe

Roast

Let’s get to the recipe. Although I focus on rib roasts below, almost everything here applies to all other beef roasts, although other roasts do not have rib bones.

Course. Dinner. Entree.

Cuisine. American.

Makes. 6 large servings

Prep time (ideal). 1 hour to remove fat and silverskin, tie up, and salt. 4 to 24 hours to allow the salt to migrate deep into the roast. 30 minutes to make and apply the dry rub.

Cooking time. In order to reach medium-rare, 130 to 135°F, in the deepest part of a roast, if it is boneless and hovering above a pan with liquid in it, if cooking starts with the meat at refrigerator temp of about 38°F, if air temp at the level of the meat is 225 to 250°F, estimate about 30 minutes per inch in diameter plus 20 minutes to sear at the end of the cook, about 5 minutes on each of the four sides. That means for a 4″ thick roast, cooking should take about 2 hours of indirect cooking, plus about 20 minutes searing over direct heat.

Resting. It is not necessary to rest the meat! If you do, it can continue to cook, a phenomenon called carry-over. You won’t lose any juices if you capture them and pour them over the meat. A lot will be reabsorbed. Read my article on resting meat.

Here’s a video that hits the highlights of this recipe.

Ingredients

1 beef rib roast, bones on, about 3 bones wide, about 8 pounds before trimming, about 5 pounds after trimming, cooking, and shrinkage

1/2 teaspoon kosher salt per pound of trimmed meat (1/4 teaspoon table salt)

1 teaspoon Mrs. O’Leary’s Cow Crust per pound of trimmed meat

Gravy (optional)

3 or more beef ribs or other beef bones

Meaty trimmings from the roast with a little fat

2 medium onions, root end removed, skin left on, and cut into quarters

2 carrots, peeled and chopped into 1″ lengths

1 stalk celery, leaves left on, cleaned, and chopped into 1″ lengths

3 tablespoons soy sauce

2 dried mushrooms

1 cup dry red wine

1 teaspoon Mrs. O’Leary’s Cow Crust

1 bay leaf

32 ounces of water

About the salt. Table salt and kosher salt contain different quantities of sodium and chloride per volume measurement. Click here to read more about different salt types and how to substitute one for another.

About the mushrooms. Just about any dried mushroom will do: Porcini, wood ears, whatever. Just toss them in. As they absorb the liquid they exude the essence of mushroom and add umami, a savory flavor amplifier.

Serve with. A big red wine.

Method

1) 24 hours before cooking. Remove the rib bones and save them for the gravy or for another meal. The gravy is optional and most of the time I don’t bother since the meat is so juicy. There’s plenty of meat between the bones and these beef baby backs can be cooked just like pork baby backs for a real treat.

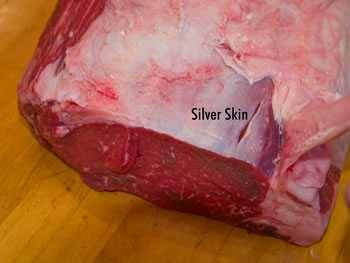
Trim off all the fat cap from the top. Go ahead and trim right down to the meat. Make sure to get the silverskin too, it can be chewy. Save any pieces that are more meat than fat for the gravy. Save the silverskin for the gravy too. Some of it melts into gelatin.

Placeholder

I leave most of the fat on the side where the bones were because it is hard to remove and it’s not very thick. But the fat cap has got to go.

2) Make it as round as possible. When you have bare naked meat, it is sort of tear-drop shaped. Press on the sides squishing it into a round tube. If necessary, tie it with string every inch or two to hold it round.

3) Dry brine 6 to 24 hours before cooking. Sprinkle it with about 1/2 teaspoon kosher salt per pound of trimmed meat (1/4 teaspoon table salt). It’s a bit hard to measure so here’s how I do it. I use kosher salt which is a larger flake than table salt and it still dissolves easily on the moist meat. I sprinkle it from high above so it is evenly distributed. And I sprinkle about the same amount I would if I was about to eat the meat. Thick cuts need a bit more. Do not oversalt! Put it in the fridge. This is a method called dry brining. The salt is sucked into the meat, seasons it, and it messes with the protein structure to help retain moisture. There is a lot of meat to penetrate, so you can use the salt generously, but don’t make a thick cake of it, and you will not need to rinse it off. It will all be sucked in. You should wrap it with plastic wrap just to keep other foods from coming in contact with meat juice.

4) 1 hour before cooking. Make a spice paste with my recipe for Mrs. O’Leary’s Cow Crust, a blend of herbs and spices mixed with water. The water releases the flavors in the herbs and spices and helps with browning and forming a crust. Let it sit for at least 1 hour before applying it to the meat so the herbs can reconstitute and release their goodness. Pour most of the paste on top of the roast. Spread it around all visible surfaces working it into the meat. Turn the roast over and pour the rest on the bottom and work it around. It does not penetrate the meat so you can do this any time up to the time you cook. Do not use Meathead’s Memphis Dust or any rub with sugar in it because this meat doesn’t need sweetness and we don’t want the crust to burn. I usually just put it in the fridge without the plastic wrap because I want the flavorings on the meat, not the plastic. It’s only for an hour or so, just be careful not to cross-contaminate other food with the meat.

5) Prepare the gravy. The gravy is really a killer beef stock. You won’t need the gravy for the meat because it will be soooo juicy, but you will like it, and you will want it for my Garlic Mashed Potatoes. And you should make my Garlic Mashed Potatoes. Yes, you really should. There will be plenty of leftover gravy that you can use for Italian Beef Sandwiches, Beef on Wick sandwiches, French Dip Sandwiches, for beef soup, or for making rice or couscous. There is no end of uses for a good, rich, homemade beef stock. But if you want to skip the gravy, nobody will complain unless you overcook the meat.

Placeholder

There are three ways to make the gravy. (a) You can make it in advance indoors, (b) you can make it while cooking the roast on the grill, or (c) you can make it in advance indoors and still put it under the roast to catch smokey drippings. All three are excellent.

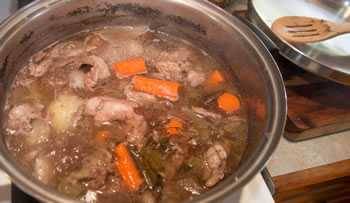
You can make a fine gravy with just the meaty trimmings from the roast, but it will be better if you add some bones. If you removed the bones from a rib roast use them. If not, ask your butcher for some beef bones. Throw the bones on a grill in indirect heat at about 325°F, or in a smoker, or in the oven until they are brown on the outside. If you have a bandsaw, cut the bones in half lengthwise so more marrow is exposed or have your butcher do it. Get a big pot and put all the bones in it. Add the meaty trimmings with the fat attached. Don’t throw all the fat in. Add the veggies. If there is no leftover rub, add some of the thyme, rosemary, and garlic powder.

If you are cooking it indoors, turn the pot on low and let it simmer for about 3 hours, lid off. Occasionally skim off any foamy scum. Don’t worry about skimming the fat yet. And don’t worry about alcohol, most of it boils off. Nobody will get tipsy. Your kids won’t be led down the path of degradation.

After about 3 hours strain out the bones and any other large solids and discard them. Then run the stock through a mesh strainer. Taste it and cook it down if it tastes too bland. When it is the right intensity, then you can adjust the seasonings. Refrigerate it. After several hours the fat will rise to the top and form a thick hard layer. Peel it off and discard it. If you have one of those fat separator cups you can use that. Back in the fridge, it goes for now. What remains is fine beef stock.

If you wish, you can put all the gravy ingredients into a pan and put it under the roast while it cooks in order to catch the smoky drippings. Another option is to prepare the gravy in advance indoors, strain it, and then put it in a pan under the roast to catch drippings.

6) Final prep. Set up your grill or smoker for 2-zone cooking and preheat the indirect zone to 225°F. It is very important that you not cook hotter than 250°F or so. I don’t care what the cookbooks or the TV chefs say. You don’t want to cook so hot that the meat gets dark on the outside before it is done on the inside. Watch the computer simulations above.

Clean the grates thoroughly before the gravy/drip pan goes on. Boil the gravy in a saucepan and then pour it into the drip pan. Don’t pour cold gravy in the pan. If you have a small grill, you can put the pan right over the fire. It then becomes a heat shield and the meat will be in the indirect zone. For more info on setting up your cooker, read my articles on how to set up a gas grill, a charcoal grill, a bullet smoker, and an offset smoker. And you can do this indoors!

7) Fire up. If you have a meat thermometer with a probe on a cable, and you should, insert it now so the tip is dead center in the thickest part of the meat. If you don’t have a probe you can leave in the meat, you absolutely must have a good digital instant-read meat thermometer and you should check it every 30 minutes at first, and more often as the cook progresses. You should also have a good oven thermometer that has a probe you can place near the meat in the grill/oven, but place it at least 2″ away so it is not in the cold air bubble surrounding cold meat. Read my Thermometer Buying Guide to learn how they work and which are the best.

Placeholder

If you made the gravy in advance, get it hot and pour it into the drip pan. If you haven’t made it yet, follow the instructions above and put the ingredients in the drip pan. Use hot water or else it will take a long time to heat on the grill and slow everything down.

8) Smoke. If you want a smoke flavor in the background simply add just a little bit of hardwood or fruitwood to the hot part of the cooker, about 2 to 4 ounces max right at the start of the cook. Don’t overdo the smoke. A little bit is nice, but too much can ruin it. I cannot overemphasize this. This cut of meat does not benefit from a lot of smoke. Keep it in the background. What kind of wood? I don’t think it makes a huge difference since you are using so little. Pick your favorite. I usually grab a fruitwood like apple. Read my article on the science of Wood.

9) Monitoring your meat. You will want to look under the hood occasionally during the cook but make it infrequently and quickly. During the cook check the meat temp after 30 minutes and more frequently as things move along. Check the drip pan, keeping at least 1/2″ of liquid in the pan. Add hot water if necessary. Do not let it dry out and burn. Look at the meat and if one side is getting too dark, rotate or turn the meat, otherwise there is no need to touch it. If you have a problem with your cooker, perhaps the gas runs out or the charcoals start to die or the temp just won’t stay at 225°F, or it is really cold outside, you can bring it inside after about an hour and finish it in the oven. It has gotten all the smoke flavor you need. But the drier heat and airflow on the grill makes a better crust than the oven.

10) Searing. When the temp in the deepest part of the interior reaches 115°F, remove the probe (it just gets in the way), remove any string if you used it, and place the roast over the hottest part of the grill. Remove the drip pan and bring it inside. Raise the lid and stand by your grill, as Tammy Wynette once sang (click the link for my version of her song). Get the surface a deep dark brown by leaving it on the hot part for about 5 to 10 minutes. Roll it a quarter turn and repeat on all four sides. We leave the lid up because we no longer want to roast the interior. We are focusing the heat on the exterior now. During this process, the interior will rise another 5 to 10°F anyway. Check the temp again and take it off at 130°F to 135°F for medium-rare.

If you are cooking indoors or on a pellet grill, you can sear under the broiler indoors. If you have a small gas grill just crank it all the way. On a gas smoker, remove the water pan and the wood pan and put the meat down close to the flame.

11) Finishing the gravy. While the meat is searing, pour the liquid from the drip pan through a strainer and taste it. It should be rich. If it is wimpy, dump it into a frying pan, turn the heat to high, and reduce it. It will reduce faster in a wide frying pan than in a narrow saucepan. Taste and add salt if needed only after it is the proper consistency, but it shouldn’t need salt because the drippings have salt in them. Pour the gravy into a gravy boat and serve alongside the platter of meat or ladle it on the mashed potatoes, or just freeze it for later use.

12) Serving. There is no need to rest the roast. It is a myth that this makes it juicier. Serve your meat hot! You will need a cutting board or a platter that can hold liquid. Even if you rest the meat a lot of liquid will flow. Don’t let it escape! First, remove the string. Use a really sharp knife and cut servings about 1/2″ thick. Pour any drippings from the cutting board onto the platter of cut meat. If you want to amp it up to 11, serve my Secretariat Horseradish Cream Sauce on the side.

And remember, the juices are myoglobin, not blood. Blood is thick, almost black, just like yours. Every time you call it blood, a bell rings and somewhere a teenager becomes a vegetarian.

“The animal is already dead. No need to kill it again.”Meathead

Published On: 11/11/2014 Last Modified: 12/11/2019

Filed Under: Cooking Tagged With: Christmas Dinner

Afraid Of Hiring A Toxic Employee?

December 10, 2019 By Boucanier

Afraid Of Hiring A Toxic Employee? Give Them The Beer & BBQ Test

BrianScudamore

BrianScudamoreFollowApr 1, 2016 · 5 min read

My company has $250M in revenue. What most people don’t know is I had to start from scratch seven years into the business because I hired toxic employees. The Beer & BBQ test was my solution.

A casual beverage with COO Erik Church. Photo by Katie Diane Photography.

We spend an average of 90,000 hours of our lives at work. This means that you probably spend more time with your team than you do with your own family. Despite this, most entrepreneurs and leaders neglect to focus on personality or cultural fit when they’re hiring.

I made that mistake myself when I was starting out as an entrepreneur, and the results weren’t pretty. Morale suffered. Productivity plunged. I was avoiding going into the office because it had turned into a negative environment filled with people who just weren’t my type.

It got so bad that seven years into the business, I literally took my eleven employees into a room and fired them all. Then I had to start from scratch and, over time, I turned things around by prioritizing compatibility during the hiring process.

Now we put an emphasis on hiring people who have the right skills and who truly click with one another — who work hard together and play even harder. Attention to cultural fit has not only made 1–800-GOT-JUNK? and my other companies better places to work, it’s helped us grow. Today, our revenue is over $250 million.

Here are two incredibly simple (and delicious) hacks I’ve developed to ensure that new hires mesh with our awesome company culture.

Hack #1: The Beer Test

As I started to rebuild my team, I realized that the recruiting process should be focused less on ticking off a checklist and more about trusting my gut. Once potential candidates were in the door, I started thinking,

“Do I like this person? Do I find them interesting, and interested? Do they have a passion for something in life?”

From this, I developed what I call the Beer Test, narrowing those questions down to one: “Would I enjoy grabbing a beer with this person?” It’s hypothetical (most of the time), but it’s incredibly powerful.

If the answer is yes, it’s likely the start of a great working relationship. Sure, it’s simple, but it cuts right to the chase, and it’s been invaluable in helping me put together a team at O2E Brands that I love working with every day.

Photo by Katie Diane Photography.

Hack #2: The BBQ Test

As helpful as the Beer Test is, there’s one major problem: it only measures my gut sense. It doesn’t take into account how a candidate clicks with the rest of the organization, and it took one especially bad hire to make me see this blind spot and its potential consequences.

A few years ago, I hired a new CFO, in the hopes of taking 1–800-GOT-JUNK? to the next level. Although this executive was highly skilled and incredibly smart, this person just wasn’t a people person, and that became a real problem. People in different departments were reluctant to work with this new CFO, and we started losing some strong team members who had become unhappy with the work environment. Despite this executive’s awesome pedigree, we had to part ways.

But how did this individual wind up on the team in the first place? Well, to be honest, the executive had passed the Beer Test with flying colors. The executive also interviewed well and we even bonded when we discovered we had the same favorite movie.

From that oversight, I came up with another critical hiring hack: the BBQ Test.

The BBQ Test is all about the group dynamic. It’s a matter of asking,

“Would this person fit in at a backyard barbecue with my corporate ‘family’?”

If you threw the candidate into a group social situation with other employees, would she be able to hold her own, or find someone to connect with? A Beer Test is singular (do I like this person?), while the BBQ Test asks, “Does he or she fit into our community?”

There’s no need to actually fire up the grill: simply introducing a candidate to the rest of the team in-office works just fine. But if they don’t get the stamp of approval from most of the group — if there’s no connection from the start — chances are they just aren’t right for the company, no matter what their resume says.

Study Shows That Having A Close Buddy At Work Increases Engagement And Productivity

A culturally-aligned team, with members that get along and genuinely enjoy each other’s company, is a more engaged team — and a more productive one. One of the most important questions asked in the Gallup Q12, a measurement tool for workplace performance, is “Do you have a best friend at work?” The stats prove that having a business best friend, a buddy you connect within and out of the office is a primary factor in employee engagement.

And when employees are engaged, they’re more productive: the Workplace Research Foundation says that highly engaged employees are 38% more likely to have above-average productivity.

So the next time you’re hiring, look past just the candidate’s credentials and also put them through my Beer and BBQ Tests. These simple hacks have helped me assemble a dream team and will help you quickly assess the cultural fit of your candidates.

I’m the founder and CEO of O2E (Ordinary to Exceptional) Brands. I’m passionate about helping others grow small to medium businesses and corporate culture. Tweet me @brianscudamore

Mission.org

A network of business & tech podcasts designed to accelerate learning. Selected as “Best of 2018” by Apple. Mission.org

Follow

410

  • Hiring
  • Leadership
  • Entrepreneurship

410 claps

BrianScudamore

WRITTEN BY

BrianScudamore

Follow

Founder and CEO of O2E Brands, including home-service companies like 1-800-GOT-JUNK?. DM me on Instagram @BrianScudamore

Filed Under: Smoker Tagged With: BBQ, Beer, Employees

Salty success: Southeast Alaska sea salt business takes off

October 29, 2019 By Boucanier

  •  Author: Elissa Brown
  •  Updated: September 28, 2016
  •  Published July 19, 2015

Share on Facebook Share on Twitter Share via Email Share on Tumblr Share on Reddit Share on LinkedIn Share on Google Plus Print article

This is a story about salt. It’s a humble mineral for one that has served as ancient currency and shaped historic trade routes.

But this is also a story about Alaska oceans, a love of place and a passion for creating an unparalleled product to share with the world.

Darcy and Jim Michener, founders of Alaska Pure Sea Salt Co., have quietly pioneered North America’s salt renaissance from their homegrown operation in Sitka.

After years of lugging jugs of seawater up the dock, they perfected the methodology to produce a unique flake-style salt. Those flakes are spreading throughout Alaska and the Lower 48, finding a place in the go-to arsenal of top chefs and in the pantries of home cooks.

The discovery

In May 1999, Jim Michener woke during his honeymoon with a troublesome thought. He and his wife, Darcy, were staying in a remote Southeast island cabin, and they’d left a pot of saltwater on the stovetop overnight. Jim worried it had gone dry and ruined the pan; instead, he found some remaining water with a few odd floaters.

At first, he thought it was dust, and he brought over a flashlight for a closer look. “It was actually beautiful salt crystals forming on the surface,” he said. “I remember thinking, this is like French Fleur de Sal, only it’s from Alaskan water — how cool is that?”

In retrospect, it seemed obvious: Evaporated seawater makes salt. “It was just by chance that it happened this way and we noticed it and thought it was kind of fun,” Jim said.

The Micheners decided to evaporate the rest of the pot into salt and take it home. “The first batch wasn’t very good,” Darcy said. “It tasted salty, but it had the texture of sand.” But still, it was a nice memory of their honeymoon trip. Each following year, Jim and Darcy returned to the same cabin for their anniversary, bringing back a small batch of homemade salt each time.

In search of the perfect flake

Before long, the Micheners grew curious about how to make truly great salt. They sampled high-quality brands from around the world and learned of an English company, Maldon, the world’s leader in flake-style salt. “It had a nice crunch and a good, clean flavor,” Jim recalled. “It was spectacular. We realized we wanted to make that, and make it from pure Alaskan seawater.”

At the time, the world’s flake salt operations were sparse: England, Cyprus, Australia. Nothing in North America, but the Micheners had a vision. After all, there’s no supply problem — scientists estimate the world’s oceans contain 50 million billion tons of salt.

It began with a large lasagna pan. Jim, who worked as a fishing guide, would come home each day with 5 gallons of seawater, ready to tinker. “We would basically run the experiment over and over,” he said. “Changing one variable at a time, we were trying to achieve a good flake.”

It was a summer of evaporating water on the kitchen stove, a summer the Micheners refer to now as the “Lasagna Pan Summer.”

They ordered a custom 50-gallon pan. Jim trucked home 50 gallons of water in the morning and 50 in the evening, relentlessly experimenting while keeping the whole operation secret.

Years went by. The Micheners saved money, wrote business plans and fine-tuned their product. “We’re using this Alaskan water that is so amazing, and we really wanted to make sure we honored our community, ourselves and the product,” Jim said. “We wanted to be able to look people in the eye and say this is as good as any flake salt in the world and it’s made from beautiful, pristine Alaskan water.”

By 2011, the Micheners had constructed a small factory and were ready for their first large-scale trial. “We basically made a big leap of faith,” Darcy said. “All of our equipment was custom-made because nothing existed for salt-making. We had tried so many times and we thought it would work, but we just didn’t know.”

The first batch was set to take 12 hours to create. But after 12 hours, no salt had formed.

“It was utter panic,” Jim said. “I knew I’d been thorough with this and there was no reason it shouldn’t work. But if it didn’t work, we’d be homeless and broke.”

He reviewed his calculations, only to discover he’d made a small error, and the process would take 48 hours longer than expected. The Micheners were sleeping and eating at the factory, setting an alarm to check on the salt every hour. After three days, the salt finally formed: white flakes, exquisite and bright. The Micheners popped a bottle of Champagne at 10 a.m.

Easiest recipe

At the heart of it, salt-making is the easiest recipe in the world. Just go to any body of saltwater. Scoop some out, and evaporate it. The challenge is in making consistent crystals because water that evaporates out of a vessel has various concentrations of salt brine, and constant adjustments are needed to keep the flakes uniform.

Alaska Pure Sea Salt is considered a flake salt, a finishing salt for sprinkling on food in the final stages. The flakes are slightly smaller than some of the world’s other flake salts, deliberately so.

“Our flake size is a little more approachable for everybody, including the average home cook,” Darcy said.

The whole process requires three to four days, and each batch starts with more than 1,000 gallons of water. It takes around 10 gallons of seawater to yield a pound of salt. The factory runs 24 hours a day, and one of the Micheners must be around to tend to the product every six hours.

With about 1,500 pounds of salt produced monthly, the operation is quite small in the world of salt manufacturing. Jim and Darcy run all aspects of the business themselves and last summer opened their first retail store.

Anchored in Sitka

The Micheners hope to build their name upon their basic, classic salt, but they’ve also begun to play around with new, seasonal flavors.

“We started thinking, let’s just make sure we’re really true to our sense of place, where we live and where we’ve lived for decades: in Sitka, in Southeast Alaska,” Jim said. “Let’s make salts that are indicative of who we are and where we are.”

They started with a smoked alder flavor in honor of the tree’s local abundance and cultural significance. Then came a vibrant purple blueberry salt — the first in the world. Last in the collection was a spruce tip flavor, a recipe that took the Micheners two years to perfect.

Colette Nelson, chef and owner of Ludvig’s Bistro in Sitka, has been one of the culinary forces who recognizes the value of salt grounded in place.

“The thing that I really like about serving their salt at the restaurant is that we pride ourselves in serving Alaskan seafood, and then when we add their salt — that’s what ocean to plate really is,” Nelson said. “Alaskan seafood served with salt from the water that the seafood is swimming in — it’s a full ocean-to-plate experience.”

Nelson uses the salt on grilled asparagus and salmon, as well as atop a chocolate torte. “It’s still a relatively new concept for people to have a finishing salt,” Nelson said. “But they’re really getting the flavor of Sitka with it.”

For the Micheners, Sitka has been a source of inspiration and abundance, but their success comes with challenges. They work hard to market their salt to larger audiences and to attend out-of-town trade shows. Despite the limitations, they hope to grow and provide jobs for locals, all while remaining true to their location and product.

One grain in the big picture

Alaska Pure Sea Salt is more than just salt. The Micheners are a part of Alaska’s local food movement, cultivating a sense of pride in the state’s landscape and resources. They’re also on a unique mission to spread salt awareness, putting Alaskan sea salt on the map with the help of enthusiastic chefs in the 49th state.

Rob Kinneen is one such chef and the founder of FORK Catering in Anchorage. He prioritizes using local ingredients, using the Sitka flake salt to finish plates as well as in desserts: alder smoked sea salt paired with chocolate, and a parsnip cake with spruce tip whipped cream and spruce tip sea salt.

“When you start talking about what Alaskan cuisine is, you look at our area and start thinking of the ingredients we have on hand, instead of ones we need to import,” Kinneen said. “We’re never going to be making a staple product and selling a billion pieces for 99 cents each. We’re going to be making higher-end products — sea salts, syrups, jams, botanicals and products that use those ingredients.”

Alaska Pure Sea Salt may be an artisanal product, but it’s also inherently fundamental. “Salt is the most natural flavor enhancer there is,” Darcy said. “It makes a big difference in flavoring your food, so if you’re going to use salt, might as well use a good one.”

The Micheners’ Alaskan sea salt is free of anti-caking agents or bleaching — its character shines through in the flavor, texture and structure. It’s caught the attention of local chefs and national restaurants, and its reach continues to spread.

“But for us, No. 1 is honoring the source and the place where we live,” Jim said.

It happens one flake at a time.

Elissa Brown is an Anchorage freelance writer.

About this Author

Elissa Brown

Filed Under: Umami

How to control fire temperature for grilling and smoking consistency

October 1, 2019 By Boucanier

Photo of Chuck Blount
Chuck Blount
Chuck Blount pours charcoal briquettes from a chimney starter into a Weber grill as he prepares to grill chicken and sausage with an off-set fire, with all the briquettes placed on one side of the grill.
Chuck Blount pours charcoal briquettes from a chimney starter into a Weber grill as he prepares to grill chicken and sausage with an off-set fire, with all the briquettes placed on one side of the grill. Photo: William Luther /Staff photographer
Sausage and chicken cook over indirect heat in a Weber grill.
Sausage and chicken cook over indirect heat in a Weber grill.Photo: William Luther /Staff photographer
Two split logs rest on a small pile of charcoal briquettes to get an offset smoker to the correct 250 degree temperature.
Two split logs rest on a small pile of charcoal briquettes to get an offset smoker to the correct 250-degree temperature. Photo: William Luther /Staff photographer.
There is such a thing as a dedication to the craft of outdoor cooking, and then there is Fred Robles.

Robles, a world champion barbecue cook based out of Weslaco, is the type of guy who constantly tinkers with his recipes, cooking devices, and meat preparations. He’s so precise with his demanding command of temperature, he counts the number of charcoal briquettes that are used to grill up his chicken.

“The magic number is 47,” Robles said. “That will usually get my grill to about 350 degrees, which is the temperature that will cook and finish the chicken the way I like it in about an hour.”

If you don’t want to spend hours experimenting briquette by briquette, here is a simplified formula: Take the diameter of your grill and multiply that number by two. That’s how many briquettes are needed to ballpark 350 degrees with the cover applied and your meat placed away from the hot coals.

There are other ways to take command of your outdoor fire, making the cooking process as simple and consistent as anything that could be done in a conventional kitchen oven. Here are some ways to do it:

Setup

The charcoal: You can go either the hardwood lump or the conventional briquette route. Both have key strengths and weaknesses.

The lump charcoal will burn about 5 to 10 degrees hotter than the briquettes, provides a cleaner wood flavor and won’t cook down into pure flaky ash. That makes it perfect for the caveman style of cooking directly on the coals. However, since the charcoal pieces are randomly sized (some chunks as big as a human fist), it can be a bit unpredictable.

On ExpressNews.com: Youth pitbuilders showcase their handmade pits that rival the pros at San Antonio Stock Show & Rodeo

Briquettes are of uniform size and will hold the heat a little longer, with a signature flavor that reminds everybody of the backyard cookouts they grew up with. Kingsford charcoal, the industry leader in briquette charcoal by a wide margin, is a staple on the competition barbecue circuit because of its ability to win over judges that score with a nostalgic palate.

Wood: Manny Olivo, owner of the Schertz-based Cow Tippin BBQ food truck, keeps his fire pure with pecan wood by taking the scraps, starting the fire small, and building it up into a blaze. “It take a little more time, but it’s worth it for the flavor,” he said.

Remove the bark from the logs and accumulate the shavings and scraps that can be pulled off the wood. As it burns, add larger pieces until you are burning chunks that are about the size of a rolling pin. One or two logs on a bed of coals will get a traditional off-set steel pit into that magic temperature window between 225 and 250 degrees. Avoid large logs, which have a tendency to smolder and can add a funky taste to the meat.

Ignition

Lighter fluid: It can make life easier in a pinch, but I avoid it at all costs, including the charcoal that comes coated with it. The fuel never completely burns off, and the flavor will transfer into the meat like a seasoning.

On ExpressNews.com: 1 smoker, 10 store-bought sauces. Which got smoked?

Chimney starter: The metal contraption that’s shaped like a German beer stein is the perfect vehicle for getting a good fire going. Stuff a few sheets of newspaper or a couple paper towels coated in cooking oil underneath your briquettes, light it up, and you should have a perfect blend of hot charcoal that glows like lava in about 20 minutes. A full starter will hold about 70 briquettes.

Flamethrower: Don’t laugh. This is a thing, and it’s legal. They sell open-flame devices, often marketed as a weed-killer in the garden section of your local hardware store, that hook up to a propane tank and will light the charcoal or wood in seconds.

Temperature control

The full spread: Unfortunately, too many outdoor cooks think that the proper way to set up a grill is to blanket the bottom with coals. That’s a disaster recipe for burgers that end up looking like charred hockey pucks because of out-of-control flames that erupt when the meat grease hits the coals. The heat above the coals is usually about 550 to 600 degrees, making it impossible to cook with precision outside the realm of a quick steak cook.

Two-zone setup: Stack all of the charcoal to one side of the grill for a hot and a cold zone that provides tremendous flexibility with anything put on the grates. This is the Robles method, and it should be yours, too. Put the meat on the hot zone to finish or establish blackened grill marks, but most of the cooking time should be spent on the cool side. If your cook lasts more than an hour, add eight to 10 new coals to the hot side after an hour.

Other two-zone setups promote putting the coals on the outside with a metal pan filled with water in the middle. Eh. The water does little to moisten the meat, and the end result is mostly a wasted pan.

Vent control: All nongas grills and smokers come with vents that are located below and on top of the device. They can help control the temperature, but I’ve always found it best to keep them open all the way from start to finish. Airflow gives every fire life, and it delivers a better flavor. If the fire is burning too hot or too cold, it’s probably because an error was made in the original setup.

It shouldn’t take very long for these tips to become second-nature in your outdoor grilling process. When fanning the flames, it’s always best to maintain control.

Chuck Blount is a food writer and columnist covering all things grilled and smoked in the San Antonio area. Find his Chuck's Food Shack columns on our subscriber site, ExpressNews.com, or read his other coverage on our free site, mySA.com. | cblount@express-news.net | Twitter: @chuck_blount   | Instagram: @bbqdiver

Photo of Chuck Blount
Chuck Blount
Follow Chuck on:

chuck_blount

Chuck Blount is an award-winning journalist with over 15 years in the field. His weekly poker column is internationally syndicated and has appeared weekly since 2005. In addition to writing duties, he is also an assistant sports editor.

Prior to the Express-News, he was a sportswriter for the Idaho Falls Post-Register, covering Idaho State athletics and high schools. He is a 1998 University of Iowa graduate.

Filed Under: Grilling

THE SCIENCE OF BBQ – WHY DOES GRILLED FOOD TASTE GOOD?

September 13, 2019 By Boucanier Leave a Comment

Through our series The Science of Barbecue, we’ve explored the processes of grilling, Caramelization, and Smoking; discussed how to make any meat into a succulent meal, and even the intricacies of marinating. All of these things make a feast full of flavor, but what IS flavor? Let us explore The Science of Barbecue – Why Grilled Food Tastes Good.

YOU’VE GOT GOOD TASTE

Taste is experienced through the use of both your tongue and nose. Your tongue is coated in about 10,000 papillae (pah-pill-ah), which are the little bumps that contain your taste buds. When you place something into your mouth it instantly comes into contact with them. Taste buds are a type of nerve cell that is activated by the chemical makeup of food. These chemicals change the specific proteins in the cell walls, sending message signals to similar sensory cells, who then pass this information to your brain as the perception of taste like sweet, sour, salty, and bitter.

The mechanics of taste are interesting in and of themselves. However, most of what we perceive as flavor, the taste of whatever you are eating, is actually coming from the aroma. The way a food smells. When you fire up the grill and toss food onto the red-hot grids, the Maillard Reaction occurs. The browning of whatever you’re cooking smells divine, activating the saliva ducts in your mouth, which will facilitate the transference of the chemicals that activate your taste buds. Smoking and Caramelization have a similar effect on your olfactory sense.

Steak

The taste map of the tongue that you are familiar with, illustrating that the tongue tastes specific flavors in specific places has been disproven. Taste can be experienced over any region of the tongue that has the presence of taste buds, although some spots may be more sensitive than others to specific tastes.

SO WHY DOES GRILLED FOOD TASTE GOOD?

Raw fruits and vegetables are edible, and even taste good, but for most food, it just tastes better when it’s been cooked. Flavor on food is developed and deepened when heat is applied. Caramelization, causes roasted vegetables to get sweeter, and meat becomes more savory thanks to the Maillard Reaction or Smoking. Proteins are broken down into amino acids, which then react with the carbohydrates present producing the scent and satisfying taste we crave. That is just the beginning. These processes, and other preparation methods, like seasoning, marinating, and injecting, accentuate the flavor profiles that you experience when eating.

IT’S A FLAVOR EXPLOSION

There are the four flavors that you already know, sweet, sour, bitter, and salty; but did you know that there are two others that you may not have a name for, but are very familiar with?

Umami:
Umami (oo-mah-mee) is a Japanese word that translates to deliciousness or yumminess. It is widely considered the fifth taste, although just being accepted in the international scientific food community. Umami can indicate protein in food. Coupled with the Maillard Reaction when we grill, it would signify, on a primal level, that food is fully cooked and safe to eat.

Umami flavor comes from one of three elements:

  • Glutamate: think saltiness like soy sauce and parmesan cheese. It naturally occurs in meat, fish, poultry, eggs, and seaweed, but has been artificially recreated in the form of MSG. It is an amino acid that is used by the body for the conversion of proteins into needed compounds in the body.
  • Inosinate: tastes like the hearty taste found in meat and fish. It is found in muscle fibers of animals mostly but can be artificially created from tapioca starch. This expensive flavor enhancer is known as kisodium salt or inosinic acid.
  • Guanylate: similar to the earthy taste of dried mushrooms. It is only ever used in conjunction with Inosinate or Glutamate. Another flavor enhancer that is produced from fish, seaweed, and yeast.

Umami is great, but when two umami compounds come together it is known as an umami-bomb or u-bomb; a complex flavor explosion. It is part of the reason certain foods taste so amazing, like grilled steak with mushrooms, chocolate covered pretzels, or **Sesame Chicken**. Add umami to your next barbecue, with a little feast, and you have a recipe for insane flavor that goes beyond just good. Try one of these umami leaden recipes.

TRY THIS AMAZING GRILL RECIPE FOR TANDOORI PORK CHOPS

Why Grilled Food Tastes Good - Tandoori Pork Chop

Fat:
Fat plays a huge role in how food tastes when it’s cooked. It’s the amount of fat that is in meat that influences the flavor; that is why we look for something well-marbled. Those striations of fat melt when heated. Amino acids and carbohydrates that are reacting to one and other through the Maillard Reaction are repelled by the water that makes up meat’s muscle fibers. Instead, those particles are being absorbed by the fat, which is what creates the aroma and taste in meat. This fat is also oxidizing during the grilling process, which brings out even more delicious aroma. Fat also feels good in the mouth. It melts and feels silky and smooth – think butter, cream, cheese sauces, and chocolate; or produces a satisfying crunch when used in conjunction with high heat – think French fries or the crust on a perfectly grilled steak. Finally, fat in food affects the way your taste buds react to food. Some flavors stick to the fat molecules prolonging the release of flavor on the tongue, giving you more complex layers of flavor and even aiding in the aftertaste.

TRY THIS RECIPE FOR BBQed CHEESE PIZZA

Why Grilled Food Tastes Good - Cheese Pizza

THE TAKEOUT

Next time you put something delicious in your mouth, think about how flavors develop on your tongue. Can you taste the separate components that make up the delicious whole? There is more to the Science of Barbecue than just how grilling works. Why grilled food tastes good involves preparation, cooking methods, and even the chemical components of the food itself. For more inspiration on making your own flavor bombs, check out our Recipe Blog for more inspiration and some great grilling flavors. Whatever you grill, now you know the science behind why grilled food tastes good.

Curated from – https://www.napoleon.com/en/ca/barbecues/science-bbq-why-does-grilled-food-taste-good

Filed Under: Umami Tagged With: BBQ, Taste, Umami

  • « Go to Previous Page
  • Go to page 1
  • Go to page 2
  • Go to page 3

NEED MORE BBQ IN YOUR LIFE?

Subscribe to receive our FREE bi-monthly Newscast, Cooking with FIRE, and never miss a new offering. 

Thank you!

You have successfully joined TaTu BBQ subscriber list.

.

Blog

  • Searching for Ethical Sugar
  • HOW TO MAKE BEEF TALLOW
  • SPATCHCOCK SMOKE ROASTED TURKEY
  • Never Thaw Frozen Fish In Its Vacuum-Sealed Packaging
  • Meat Your Maker: The Origins of “Barbecue”
  • Great Brown Butter Cornbread
  • True Barbecue
  • Basic Meat Science For Cooks

Copyright © 2021 · TaTu BBQ · All Rights Reserved