• Home
  • BBQ4Wounded
  • Rub/Spice Store
  • Kudo’s
  • Newscast Blog
  • Tips and Tricks
  • About
  • Contact

What You Need to Know About Wood, Smoke, And Combustion

July 18, 2020 By Boucanier

By Meathead Goldwyn

Smoke is the essence of barbecue. It is what differentiates barbecue from other types of cooking.

different types of barbecue and grill smoke

"'When a lovely flame dies, Smoke gets in your eyes.' Song 'Smoke Gets In Your Eyes'"by Jerome Kern and Otto Harbach, performed by The Platters

Originally all barbecue and grilling was done with logs of dried hardwood as the sole fuel source. Heat cooked the meat, and smoke from the wood and from dripping juices imparted a distinctive seductive scent that is the essence of barbecue. But it is difficult to control the heat and flavor when cooking with logs, so today, only a few expert pitmasters outfitted with special rigs cook with logs only.

Today, most grills and smokers use charcoal or gas to produce the heat, although a few use wood pellets or electricity. They get flavor and aroma from the addition of wood in the form of wood chips, chunks, bisquettes, pellets, logs, or sawdust. When heated, they make smoke. Smoke can also come from meat drippings, which are laden with fat, protein, spices, and even sugars from sauces. Adventurous cooks can also get smoke from dried herbs, tea, and even hay. But not all smoke is created equal.

Smoke is a combination of tiny particles that we can see in an aerosol mixed with water vapor and a complex cocktail of gases. The exact mixture is crucial and it can add elegant vanilla and brown spice notes or coarse bitter ash tray taint.

Placeholder

Cookers that get heat from logs, charcoal, gas, pellets, and electricity each produce noticeably different flavors because each fuel produces a unique combination of combustion byproducts.

Combustion, as it applies to barbecue and grilling, is a sequence of chemical reactions between oxygen and another fuel that are ignited producing a change in the chemistry of both, creating heat, light, and smoke with its blend of particles, water vapor, and gases.

This video gives a good overview of this article.
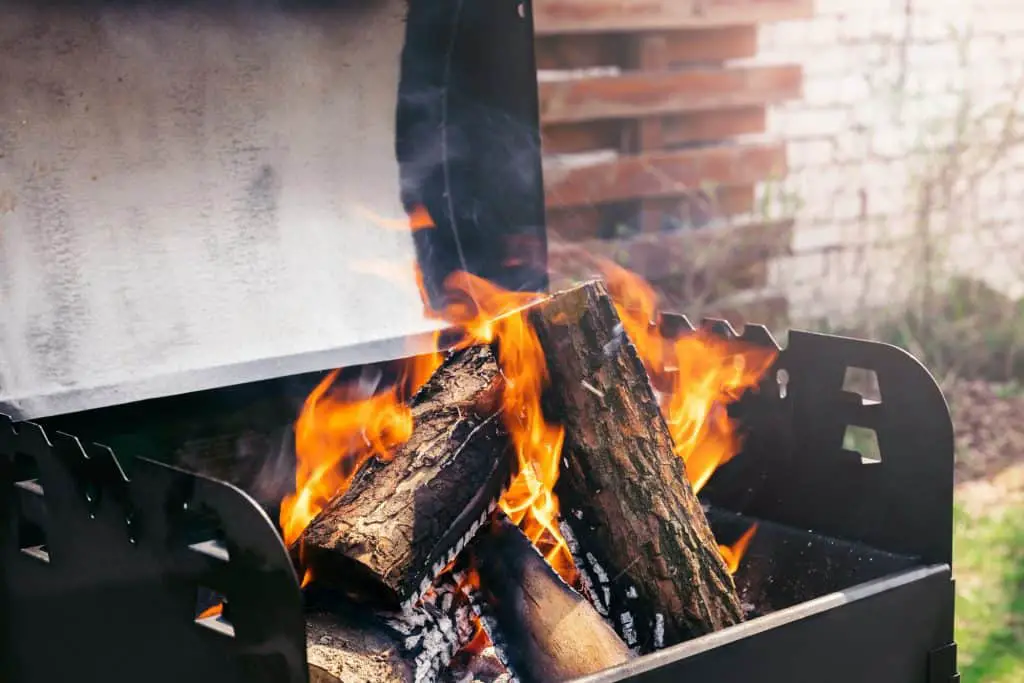
Burning wood

Hardwoods, deciduous trees which include fruit and nut woods, have compact cell structures, and they are the best woods for cooking. Softwoods, like pine, fir, spruce, redwood, hemlock, and cypress, are all evergreen, coniferous trees, and they have more air, more pungent sap, and they burn fast. They are not recommended for cooking. We'll talk more about different wood types below.

Fresh cut hardwood has a lot of water in it, up to 50% by weight, it produces a lot of steam and off flavors during combustion, and it takes up to 45% more energy than charcoal or gas to dry it out, so most wood for cooking is hardwood that has been air dried.

Dried hardwood is rarely totally dry, perhaps 5% water. Of the remaining 95%, about 40% is cellulose, about 40% hemicelluloses, 19% lignin, and 1% minerals. Actual numbers will vary depending on the wood species, subspecies, age, soil, and climate.

Cellulose and hemicelluloses are large molecules made of carbohydrates and sugars. Lignin is another complex compound that gives wood strength, and it is found mostly in cell walls.Wood also contains oxygen, nitrogen, carbon, and hydrogen among many other molecules. The minerals in wood include, potassium, sulfur, sodium, chlorine, and heavy metals. Although there are only trace amounts, these minerals can significantly impact the aroma and smoke flavor.

According to The Forest Encyclopedia, smoke flavor is influenced more by the climate and soil in which they are grown than the species of wood. This is very important to note, especially when you are caught up in the game of deciding which wood to use for flavor. This means that the differences between hickory grown in Arkansas and hickory grown in New York may be greater than the differences between hickory and pecan grown side by side. More on this below.

When burned thoroughly in a lab, wood produces about 8,600 BTUs of heat per pound, about half of the mass is converted to carbon dioxide and about half to water vapor. In the real world of a grill or smoker, wood is never burned thoroughly.

Wood has a lot of airspace in it and is a good insulator. That's why you can set one end of a stick on fire and hold the other end. It is also why wood burns unevenly with different parts at different temperatures.

Dr. Blonder explains that during combustion wood goes through four stages. When it is really going good, all four stages can be happening at once.

Stage 1 - Dehydration (up to about 500°F). In this stage wood must be heated from an external source like a match, kindling, rolled up newspaper, or (horrors) lighter fluid. The wood drys out the rest of the way, water steams and evaporates, and some gases like carbon dioxide are given off, but there is no flame or heat produced.

Stage 2 - Gassification and pyrolysis (500 to 700°F). Here's where combustion begins. The compounds in wood begin to change, and some come off as flamable gases, some form oily liquids and tars. The gases will burn if you give it an ignition source like a flame or spark, but they will not ignite on their own. Let's call the combustion point 575°F on average for the sake of discussion.

Stage 3 - Burning bush (700-1,000°F). An apt term coined by Dr. Blonder to describe the phase most important to cooks. Flame appears and more gases emerge, among them nitric oxide (NO) which is essential for formation of the smoke ring in meat. In the sweet spot of about 650 to 750°F, the best aromatic compounds for cooking come off, among them guaiacol and syringol, which are primarily responsible for the aromas we call smoke. Some are ethereal and dissipate, and that's why barbecue doesn't taste the same after it has been reheated. As the temp rises above 750°F, acrid, bitter, and possibly hazardous compounds are formed.

During the burning bush stage, heat creates gases that rise from the fuel creating something like a gas bubble, but the wood itself is not consumed. The bubble is surrounded by air that is about 20% oxygen. If there is any source the gas bursts into flame as the gases and oxygen combine. If all the gases are able to combine with the oxygen, a blue flame is visible. This never happens with wood or charcoal so the flame glows yellow or orange. If unburned gases escape, the bubble cools and creates smoke. Charcoal and wood fires are inefficient and so their flames are orange, yellow, and red.

Placeholder

Stage 4 - Charcoal formation (above 1,000°F). Most of the organic compounds have burned off leaving behind pure carbon, or char, which burns with little smoke.

Burning propane and natural gas

A gas grill has a venturi, a valve that blends the gas and oxygen like a carburetor. When there is too little oxygen some of the fuel is unburned and sooty. The soot glows yellow and orange, like an ember. When properly blended all the fuel is completely burned and the flame is nearly blue. Click here to read more about gas grills and smokers and how they work.

When propane or natural gas combine with oxygen and they are ignited, they produce water vapor, carbon dioxide, carbon monoxide, and not much else. Wood and drippings are needed for flavor.

Placeholder


Burning charcoal

Charcoal is almost pure carbon made from wood that has been preburned in an oven with very little oxygen. When burned in a grill or smoker, charcoal, like wood, it burns hotter than wood and produces a lot of combustion byproducts, although fewer than does wood. For a detailed explanation of how it is made and how it works, read my article on the Science of Charcoal.

Electricity

Electric cookers use a glowing metal coil for heat, so there is no flame, and no combustion gases. Even if you put wood chips on an electric coil, the flavor of the smoke is vastly different, and to many tasters, inferior for most foods because it lacks the complexity that the combustion gases from wood or charcoal produce. Even though propane or natural gas don't produce a lot of combustion gases, they burn at a hotter temperature producing better smoke.

What is smoke?

Smoke includes as many as 100 compounds in the form of microscopic solids including char, creosote, ash, and phenols, as well as combustion gases that include carbon monoxide, carbon dioxide, nitric oxide, syringol, and liquids such as water vapor and syringol, an oil.

Trace amounts syringol are responsible for much of the smoke aroma we love and trace amounts of guiacol are responsible for much of the taste of smoke. The composition of smoke depends a great deal on composition of the wood, the temperature of combustion, humidity, and the amount of oxygen available.

If the wood does not get enough oxygen it can still undergo pyrolysis and gassification, but not burning bush. It will not burst into flame, it will smolder, and smoldering wood produces lots of smoke and a different flavor than burning wood. Why would it not get enough oxygen? If the intake vents and chimney are not open wide enough. Click here to learn more about controlling vents and chimneys. Getting enough air can be a problem in kamado type smokers that are so well insulated and retain so much heat that we often have to choke off airflow to keep it from running too hot.

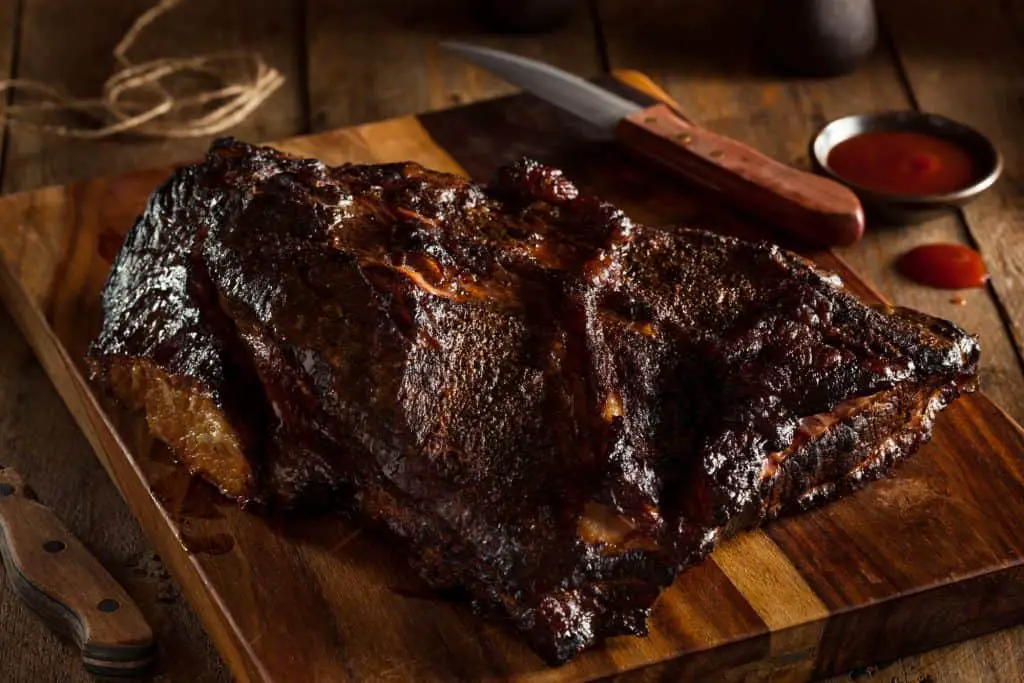
Wood also plays a role in the color of the meat and the formation of the crust on the meat, also called the bark. Below are two slabs of ribs with the same spice rub but no sauce. The one on the left was cooked on a charcoal smoker and the one on right was cooked on a gas smoker. You can see and taste the difference. They were both excellent, but different. The one on the right had a bit of a bacon or ham undertone, typical of gas smokers.Placeholder


Blue smoke for long cooks

Smoke from wood or charcoal for cooking can range from bluish, to white, to gray, to yellow, brown, and even black. The most desirable smoke is almost invisible with a pale blue tint. You can see it below. Blue smoke is the holy grail of low and slow pitmasters, especially for long cooks.

Dr. Blonder explains that the color depends on the particle size and how it scatters and reflects light to our eyes. Pale blue smoke particles are the smallest, less than a micron in size, about the size of the wavelength of light. Just because you can't see it, doesn't mean it's not there. Pure white smoke consists of larger particles, a few microns in size, and they scatter all wavelengths in all directions. Gray and black smoke contains particles large enough to actually absorb some of the light and colors.

Black and gray smoke happen when the fire is starving for oxygen, and they can make bitter, sooty food tasting like an ash tray. Billowing white smoke is common when you just start the fire, and when the fuel needs lots of oxygen as it goes through stages 1 (dehydration) and 2 (gassification). If it doesn't get enough and if the fuel is not emitting gases for stage 3 (burning bush combustion), the fuel smolders and produces white smoke. For short cooks of thin meats, you might just want the heavier, more intense white smoke, and we'll discuss that below. Here are some tips on how to get blue smoke for long cooks.

Get your smoke from wood. Don't worry if your wood bursts into flame. A lot of beginners fret over their burning wood and want it to smolder and belch smoke. You'll use more wood if you let it burn, and you'll have to struggle a bit to maintain temperature control, but you'll get better flavor.

Charcoal belches flamboyant white smoke when it is igniting. You don't want to add meat until the coals are fully aflame and at their peak in heat, when it has a white coat of ash. Then add wood at the start of the cook. Remember, charcoal is for heat, not flavor. If the temp runs up a bit at the start of the cook, it's not a big problem. The meat is cold and it can take a little extra heat. Then, when the wood burns out, stabilize the temp.

Keep your cooker clean. Sticky grease on your cooking grates can create black smoke and drip on the food. Grease smoke is not good smoke. Click here for more on cleaning your cooking grates. The black stuff on the walls probably has a lot of condensed creosote in it. A thin layer of neutral carbon is harmless, but black sticky goo is not. Many competition pitmasters power wash after a cookoff. Click here for more on cooker cleaning and maintenance.

Control oxygen. Make sure coals have plenty of oxygen. If coals are choking for lack of oxygen, they burn incompletely and can coat your food with gray soot. If that happens, get the meat off, rinse it, adjust the fire and put it back on. Don't let your embers sit in ash which can smother them. Keep them on a grate above the bottom of the firebox. Knock ash off occasionally and if necessary, remove it.

Use dry wood. Wet wood makes bad smoke. It also cools the fire. Read my article on soaking wood. Some pitmasters will even put the wood on top of their smoker to drive off any remaining water.

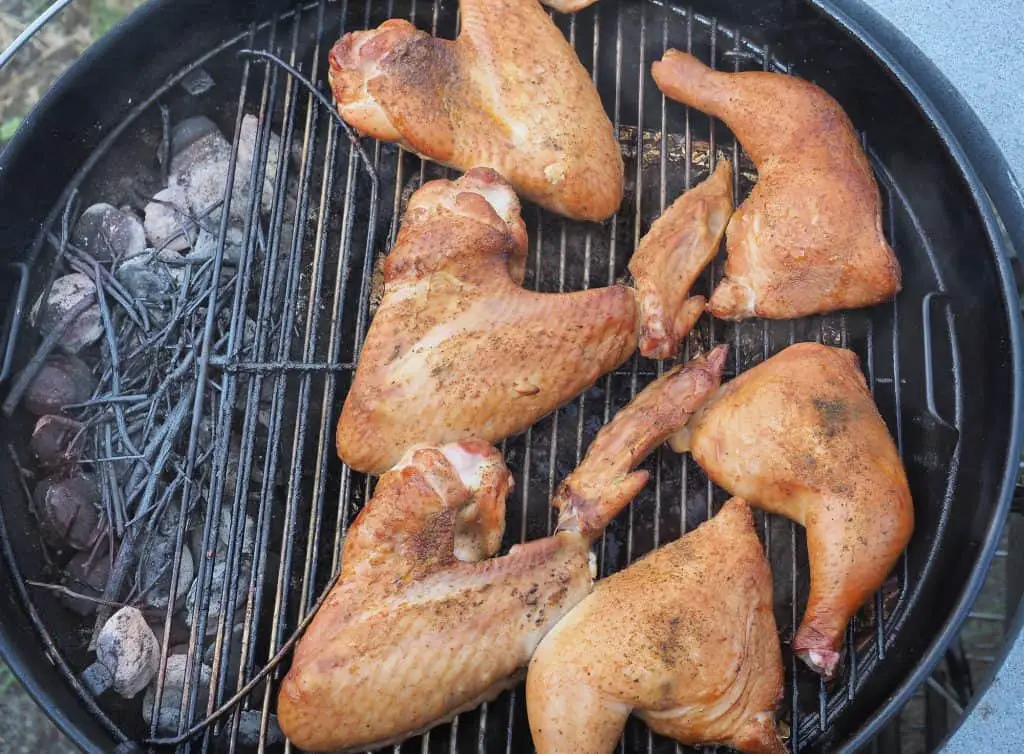
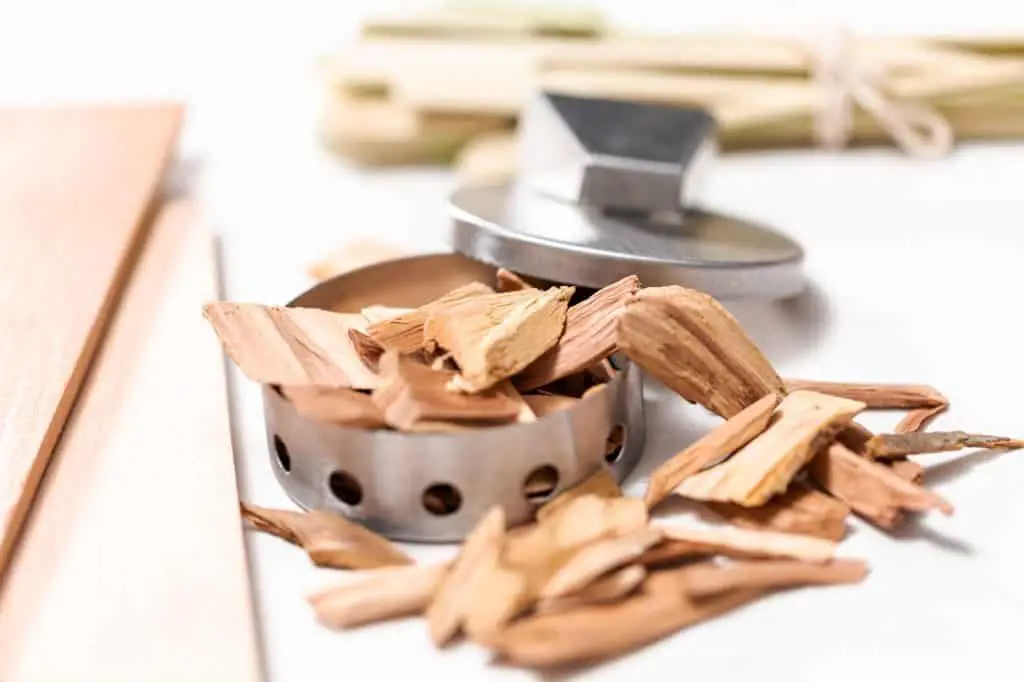
Size matters. For long cooks, chunks of wood from golf ball to baseball size work best. For short cooks, like a steak, chicken, or fish, small chips and especially pellets work best because they produce more smoke in a short burst. Some remove the bark from their wood.

Build a small hot fire. You want to see flame. Fires burning in the 650 to 750°F range in the hot spots burn off the impurities that can becreated in an incomplete secondary combustion. That means that you need a lot of oxygen so you want your exhaust vent open all the way. The hot air rising through the chimney will draw in air through the intake vent. You will probably want it open wide or close to it. Low smoldering wood creates dirty smoke.

This is why high quality offset smokers, the ones that look like a big barrel on its side with a small barrel attached, are so popular with experienced pitmasters. But there is a big difference between the cheap offsets at the hardware stores and the serious pits made for competition teams and caterers. Cheapo Offset Smokers (COS) include Brinkmann Pitmaster, Brinkmann Smoke'N Pit Professional, Char-Broil Silver Smoker, Char-Broil American Gourmet, and especially the Char-Griller Smokin Pro. They are nothing but headaches. The doors don't fit properly so you can't control oxygen intake, the walls are thin so they don't retain heat, and they rust. Expensive Offset Pits (EOS) include Horizon, Jambo, Klose, Lang, Meadow Creek, Peoria, Pitmaker, and Yoder to name a few. They are superb cooking tools. The picture below is inside the firebox of Darren Warth's Jambo. His team, Iowa's Smokey D's, one of the winningest cooks on the circuit. Notice that most of it is glowing embers and a log almost burnt to embers, and there on top is a small block of hardwood for flavor. Go to our equipment reviews database for ratings and reviews.


Placeholder

This is also a problem with kamados and eggs. They are so well insulated and so efficient with the heat right below the meat that they typically burn small cool fires and smolder white smoke.

Start charcoal and logs on the side. Start your logs or charcoal on the side and add only hot embers. I use a chimney in a wheel barrow. Remember, when it is burning properly, charcoal doesn't produce much smoke.

Allow the fire to get rolling and allow the pit to warm up. Start the fire well before the food goes on. Warm the walls of the cooker.When a recipe says "preheat" your cooker, do it. Adjust your airflow and get the temp, fire, and smoke stabilized. Be aware of the weather. It is harder to get blue smoke in cold, rainy, or windy weather.

Cook indirect. If the meat drips on the fire, water can douse the embers and fat can burn and produce dirty smoke. These drippings can create flavor, especially for short fast cooks, but for long low and slow cooks, they can cause problems.

Use your senses. It's hard to see the color of the smoke at night, but the smell should be sweet, with meat and spice fragrances dominating. The smoke aromas should be faint and seductive, perhaps like vanilla, not like a bonfire smell.

Use good thermometers. Cooking is all about temperature control. You need good thermometers in your cooker and in your meat. Enter the digital age and get a digital thermometer.

Practice. Do dry runs without food until you can anticipate when more fuel is needed, how to adjust the airflow, and how to react when the smoke starts going bad.


White smoke for short cooks (and when you have a new Pope)

White smoke usually has a compounds from incomplete combustion and prolonged exposure to white smoke is not ideal, it can still make good food. If you are cooking hot and fast, white smoke is a good way to get some smoke flavor on the food in a hurry. White smoke is best for short cooks like burgers or steak.

Placeholder

The best way to create white smoke is to deliberately starve the wood of oxygen and make it smolder. Experiment with containers for the wood. Here you can see a foil packet with holes punched in it and a small aluminum loaf pan crimped to restrict airflow. For short cooks, like a steak, chicken, or fish, small chips and especially pellets work best because they produce more smoke in a short burst.

PlaceholderPlaceholderPlaceholder


Placeholder

In recent years there have been a dozen new products brought on the market to hold wood and add white smoke to the cooker. I have played with a number of them, and the one that impresses me the most is this clever design, especially for use with gas grills. It is called Mo's Smoking PouchPlaceholder.

It is a pouch of fine mesh stainless steel that holds wood chips or pellets. The airspaces in the mesh are small enough that they limit the amount of air that gets in so the wood smolders and never bursts into flame. It puts out plenty of white smoke, usually within a few minutes. Best of all, it smokes just by putting it on top of the cooking grate or you can stand it on edge and slip it between the grates and the back of your grill. You don't have to squeeze it in down by the burners although you can if you need to space on top of the grates. And it works. It holds enough wood for about 15 minutes for short cooks, but you need to refill it, or buy a second pouch, for long cooks like pork shoulder and brisket. Refilling can be tricky since the steel gets hot and stays hot for a while. If you have good gloves, no problem.

Creosote

Creosote is among the compounds in smoke and it is the Jekyll and Hyde of smoke cooking. On the Dr. Jekyll side, creosote contributes positively to the flavor and color of smoked foods and acts as a preservative, among the reasons that smoking meat was used for preservation before refrigeration. Dr. Blonder says "Creosote is always present in charcoal or wood smoke, and a few components of creosote (guaiacol, syringol, and phenols) are the largest contributors to smoke flavor. No creosote, and the meat might as well have been boiled." On the Mr. Hyde side, "If the balance of the hundreds of chemicals in creosote shifts, it can taste bitter rather than smoky."

Commercial creosote is produced by distilling tars from primarily beechwood or bituminous coal (not charcoal). Careful control of the combustion temperature, oxygen flow, and pressure produce a wide range of aromatic oils and tars. Creosote from coal tar is the black stuff used to preserve telephone poles and railroad ties. Coal tar creosote is classified as a possible carcinogen. Anybody who has a wood burning fireplace knows that creosote from logs can cling to chimneys, clog them, and even ignite, burning down the house.

These industrial chemicals give the creosote found in barbecue smoke a bad name. I am unable to find any research that implicates the small amounts of creosote in barbecue with health risks.

According to Blonder, "When you smoke low and slow at temperatures like 225°F, many smokers require you to control the fire by damping the oxygen supply which moves it below the ideal combustion zone, creating black smoke, soot, and more creosote. Unfortunately, this is often the case with kamado and egg smokers. The best smokers combust at a high temp to create the ideal flavor profile and direct a small fraction of the smoke across the meat.

To control creosote, practice good fire management techniques and practice, practice, practice.

Smoke and food

In a smoker or grill, after combustion, the smoke rises and flows from the burn area into the cooking area. Most goes right up the chimney and very little contacts the food. Blonder explains why: "Around every object is a stagnant halo of air called the boundary layer. Depending on airflow, surface roughness, and so on, the stagnant layer of air around a piece of meat might be a millimeter or two in thickness. When smoke particles approach the meat's surface, they follow that boundary layer around the food. Very few ever touch down. We've all cursed a form of this piece of physics while driving: Gnats follow the airstream over the windshields, while larger insects leave green sticky splats at the point of impact."

So using a spice rub not only adds flavor, but it helps break up the boundary layer.

Placeholder

To show the way smoke sticks to food, we did some experiments.

Blonder suspended three cotton disks in a smoker at 225°F for 30 minutes. One disk was dry, one soaked in oil, one soaked in water. The results were pretty dramatic. The atmosphere inside a smoker is as dense as a London fog, yet no visible smoke stuck to the dry cotton pad. Some smoke adhered to the oiled surface, and far more stuck to the wet surface.

Placeholder

Why does the wet pad gather so much more smoke? Blonder explains that smoke impacting the dry pad simply bounces off because there is nothing to hold it. But the oily and wet pads are tackier. But why does the wet pad attract more smoke than the oily pad? The answer is thermophoresis, according to the physicist.

Placeholder

Thermophoresis is a force that moves particles from a warm to a cold surface. Look at the three beer cans here. First we painted them white. The one on the left was filled with ice water and put in the smoker. The one in the middle was left empty and put in the smoker with the ice water can. The one on the right was left empty and sat on my desk as a control. You can see how much more smoke the cold can attracted. In fact you can even see where condensation on the can ran down the sides.

In the first experiment with cotton pads, in addition to the stickiness of water, the wet cotton pad was cooled by the evaporation of the moisture in the pad so it was well below the temp of the others. That's another reason why it was smokier.

The same thing happens to meat when you put it in the smoker. No matter what temperature your smoker's air is, the center of the meat, which is about 75% water, will never get hotter than 212°F, the boiling temp of water. It will start at about 38°F, refrigerator temp, and rise to perhaps 205°F. In theory the surface could dry out completely forming a very hard bark and it might get hotter than 212°F, but that is rarely the case. In fact, as the interior temp rises to about 200°F, it might even be hotter than the surface which is still being cooled by evaporation. So if you are cooking at 225°F or higher as I recommend, the meat will always be cooler than the air.

To see thermophoresis in action, do this experiment: Empty two beer cans the usual way. Fill one with ice cold water and leave the other empty. Put them in your smoker for 30 minutes. See which one is covered with smoke condensate.

Smoke flavor is almost all on the surface of the food

Placeholder

As we see, smoke particles and gases glom onto the surface of foods. There they may dissolve and penetrate a tiny bit below the surface but not very far. Rarely more than 1/8". This is the same phenomenon with marinades. Meats, especially, are hard to penetrate. Don't believe me? Here's how to prove it to yourself. Get a four pound section of pork loin (not tenderloin). Cut it in half. Do not use rub, and smoke the heck out of one half at 225°F until it is about 180°F internal temp. Use as much smoke as you want. Bake the other half, sans rub, in the indoor oven at 225°F until it is about 180°F internal temp. Let them cool a bit and cut a slice out of the middle of each. Now take a core sample of each as in the picture below. Make sure the center meat doesn't get to roll around on the cutting board in the juices from the surface if there are any juices left in this lean cut. Have a friend serve the centermost parts to you with your eyes closed. No smoke!

Also, building enough smoke to create flavor takes time. On a thin skirt steak for fajitas, there will be much less smoke flavor than on a 1 1/2" thick ribeye steak cooked to medium rare, about 130°F. A thick steak will have much less smoke flavor than a chicken breast the same thickness because the chicken needs to be cooked longer, to 165°F. And a turkey breast will have more smoke flavor than all of them because it is thicker still.

Does meat stop taking on smoke?

There is a popular myth that at some point the meat stops taking on smoke. Sorry, but meat does not have doors that it shuts at some time during a cook. There is a lot of smoke moving through the cooking chamber although sometimes it is not very visible. If the surface is cold or wet, more of it sticks. Usually, late in the cook, the bark gets pretty warm and dry, and by then the coals are not producing a lot of smoke. Smoke bounces off warm dry surfaces so we are fooled into thinking the meat is somehow saturated with smoke. Throw on a log and baste the meat and it will start taking on smoke again. Just don't baste so often that you wash off the smoke and rub.

Less is more and enough is enough

One of the biggest mistakes we make is using too much smoke. Too much smoke can make your meat bitter or taste like an ash tray. I cannot give you a precise amount because each cooker is different and the amount of wood to get the right flavor will depend on the volume of the cooking chamber, the airflow, leaks, how often you peek, the kind of wood you use, basting, humidity, the weather, and of course, your preferences. You will need to experiment, but a good rule of thumb is start experimenting with about two ounces of wood, regardless of the cut or weight. For dense, thick cuts of meat such as pork butts for pulled pork or beef brisket, you can double or triple the amount of smoke. If the results are not smoky enough, you can add more wood on your next cook.


Placeholder

In any case, it is best to weigh the amount of wood you use so you can increase or decrease it as you wish in future cooks. Kitchen scales are very useful tools especially for flour and salts for curing. My favorite is the OXO Good Grips Stainless Food Scale with Pull-Out DisplayPlaceholder. It can weight accurately up to 11 pounds as well as fractions of an ounce. Push a button and it converts to metric. Put the bowl on the scale and push a button and it zeros out so the bowl's weight is not included. The top comes off for easy cleaning.

Here's where to start your experiments: On charcoal, start with no more than 8 ounces of wood by weight for pork and beef. Use no more than 4 ounces for turkey and chicken. Add it in doses. Put on about two ounces when you put on the meat and add another two ounces when you can no longer see smoke. On gas grills, double the amount because they have a lot of ventilation. Take notes. If you want more smoke after tasting the meat, add it 2 to 4 ounces at a time on subsequent cooks. Keep records of your experiments on a cooking log.

Unless your cooker is designed for it and unless you have a lot of experience, do not try to cook with wood for both heat and flavor. It is too hard to control the temp and the amount of smoke. When you become an expert, you may be able to cook with wood only, but at the outset stick to charcoal or gas. If you are ready to try, read this article on smoking with wood first.

Putting wood to work

So here's how to take advantage of this info.

Use cold meat. As described above, smoke is attracted to cold meat. Do not let the meat come to room temp. Besides, it takes forever for meat to come to room temp. Yet another myth.

Use a spice rub. Rough up the surface with a spice rub. A layer of spices and herbs helps to reduce the boundary layer so more smoke will stick.

Keep the meat moist. You can do this by spritzing the meat with a spray bottle you can buy in a drug store. A mop or basting brush can wash off your spice rub. You can use apple juice if you wish, but it adds very little to the flavor in comparison to the rub and sauce. You can use cranberry or pomegranate for color. But really, all you need is water. And don't worry, opening the cooker every 30 minutes to spritz will not slow the cooking process measurably. Yet another myth.

Add humidity to the atmosphere with a water pan in the smoker. And don't bother putting juice or beer in there. Use water pans in your smoker. They add water to the atmosphere, but more importantly the water slows evaporation keeping the meat's surface moist.

Add wood early but only after the fire is hot. Meat soaks up more wood flavor at the start of the cook, and the colder the meat the more smoke it absorbs. But don't put meat into a cooker with charcoal that is not fully engaged and belching smoke.
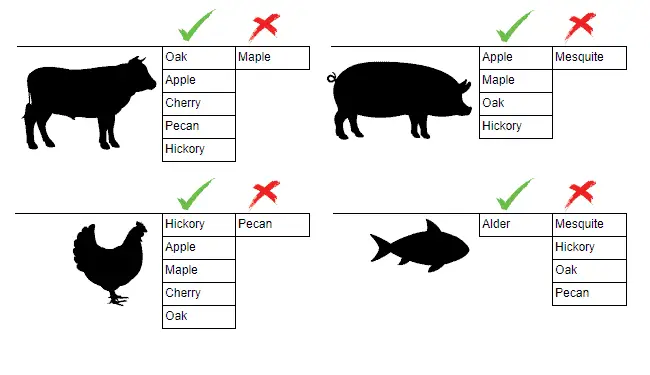
Which wood?

Cured (dried) hardwoods with low sap are the best for barbecue, especially fruit and nut woods. They all have slightly different flavors, and it is impossible to describe them. The internet is full of guides attempting to describe the flavors of different woods. They remind me of the florid descriptions wine lovers use. Most of them are just copied and pasted from website to website. I don't find these descriptions very useful. Frankly, I think most of it is a bunch of hooey. More barbecue mythology.

First of all, there are different kinds of each wood. For example, there's shagbark hickory, scrub hickory, pignut hickory, red hickory, and more. There's post oak, white oak, black oak, live oak, pin oak, and more. The climate the tree is grown in can impact flavor. Hot climate drought-stressed Texas oak grown in sand tastes different than cool climate Michigan oak grown in river silt. Furthermore, the amount of bark and can significantly impact flavor. How long it has dried and the percent water left in the wood significantly impacts flavor and aroma. And most importantly, the temperature of the fire, humidity of the cooker, and fuel type have a massive impact on flavor. Then throw your spice rub and sauce into the taste profile. Oh, I almost forgot, then there's the meat. Yakima Valley Washington Apple might taste one way on pork, but will taste entirely different on beef or turkey. Can you taste a smoked rib with Meathead's Memphis Dust and Sweet Baby Ray's sauce and tell me what wood was used? Get real.

To make matters worse, there is no guarantee that the wood in the bag is the wood on the label. Coffee, olive oil, and fish markets are regularly rocked by scandals of fraudulent labeling. How do we know that the bag of cherry wood sold in the big box hardware store is really cherry? When the warehouse for Home Depot calls and orders 10,000 bags of oak and the rickyard only has enough for 7,000 do you think that maybe they might mix in a little hickory to complete the order? You know they don't say "gosh we don't have it, why don't you call somebody else." Then there are pellets. Almost all wood pellets are at least half oak, with apple, cherry, etc. comprising the remainder. They do this to make it feed and burn more easily. What if you bought a tub of butter and it was really half margarine?

Here's the best I can do based on the woods I have used. I compiled this table from my notes and notes of others, but it is crucial that you understand that there are many many variables such as how dry the wood is and the species (there are at least 100 species of genus querkus, aka oak). Remember, I have judged food and wine around the world, I have won wine tasting championships in contests where I had to identify wines blind, and I would love nothing more than to tell you that a particular wood has "nuances of spice with an undertone of mushrooms". I just can't do it. There are too many variables.

Genus Smoke Energy Sparks Embers
Alder Mild Low Few Fair
Apple Medium High Few Excellent
Cherry Medium Medium Few Excellent
Hickory Strong High Few Excellent
Maple Mild High Few Excellent
Mesquite Strongest High Few Excellent
Oaks Medium High Few Excellent
Peach Medium Medium Few Fair
Pear Medium High Few Fair
Pecan Strong High Few Good
Plum Medium High Few Excellent
Walnut Strong High Few Good

I avoid mesquite although it is very popular in Texas. It can be harsh, bitter, and pungent. Hickory is the tried and true mate for pork, but some people find it too aggressive and occasionally it can taste bitter. Fruit woods tend to impart a sweetness, but this may just be the power of suggestion because we know fruit to be sweet. Then there are the exotic woods: Citrus, dried citrus peels, pistachio wood, corn cobs, nut shells, coconut shells, mango, and even mahogany. Who knows?

The choice of wood is crucial when you are using logs for both fuel for heat and for flavor. It is not very important when you are throwing a few chips and chunks into a pile of charcoal or onto a gas grill or even in a pellet smoker.

Stop obsessing over which wood to use. Pick one and stick with it for a while. The quality of the meat, the spice rub, fire control and cooking temp, the meat temp, and the sauce impact the final taste profile far more than the name on a bag of wood. Once you have everything else under control, then you can experiment with different woods.

Avoid softwoods. Whatever you do, never use wood from conifers such as pine, fir, cyprus, spruce, redwood, or cedar. They contain too much sap and turpenes, and they can make the meat taste funny. Some have been known to make people sick. Yes, I know that cedar planks are popular for cooking salmon on, but I don't know anyone who burns cedar as a smoke wood. I have also heard that elm, eucalyptus, sassafras, and sycamore impart a bad flavor. Many woods are can be irritants or poisonous, among them oleander, mangrove, laburnun, sassafras, tambootie, yew, and poisonous walnut (but not other walnuts). A good source for general info about woods is the wood database.

Never use lumber scraps. Some lumber is treated with chemicals that are poisonous. Never use wood that has been painted. By the way, that's one of the reasons I don't use lump charcoal. You can see lumber scraps in there and it makes me wonder how careful they are to prevent treated lumber from getting in the bag.

Never use wood that is moldy. Some molds contain toxins.

Use dry wood. Freshly cut "green" woods have more sap, burn irregularly, and impart different flavors than dried wood. Air dried wood is usually slightly wetter than kiln dried. Kiln dried used to be rare but with more and more restaurants using wood for grilling, kiln dried has become more common as health departments demand it to kill insects, molds, and bacteria. The wood is placed in a room and heated to 200 to 240°F to drive off the moisture. If you buy kiln dried, ask for 15 to 22% moisture. The water provides steam that makes the droplets larger and stickier.

Bark or no bark? Some wood has more bark than others and that can impact the flavor. Some folks say you should remove the bark. Bark has more air in it and is less tightly bound so it will burn differently than heartwood. I don't remove it, but I try to keep it to a minimum. I know top cooks who remove it all. I know one cook who says hickory bark is the only one good enough to use.

What do I prefer? If I was on a dessert island I would want a bag of apple chunks and a bag of small apple chips or pellets. I would use the chunks for steady slow release smoke, and the chips or pellets for quick smoke. Apple is mild and rarely tries to take center stage.

Where to get it? There are a number of barbecue specialty stores opening around the country and there may be one near you. Most hardware stores carry only hickory or mesquite, but a few carry expanded barbecue supplies and a selection of woods. Watch the newspaper for ads from stores promoting a lot of grills. Then give them a call. Another option is to go to an orchard and ask if you can have some dead trees or limbs but be careful, they could be laden with pesticides or other sprays. Also there are a number of places to buy wood on the net. Click here for contact info for online wood suppliers.

The different shapes of wood

PlaceholderLogs. Most barbecue woods are cut from hardwoods, fruitwoods, and nutwoods, but never pine and softwoods that have a lot of turpenes and sap. Logs must be dried. Here is a small part of the acre sized pile of post oak at Kreuz Market in Lockhart. TX.Placeholder

Some cooks throw whole logs into their pits, but you must have the right pit and skill set to pull this off. Done improperly this can easily ruin your meat.

More commonly, "stick burners" preburn the logs reducing them to embers before cooking with them. Smoking with logs usually needs to be done at a higher temp, perhaps 275°F rather than 225°F because the fire must be hot in order to create clean smoke. Click here for more on cooking with logs.

Placeholder

Squogs. In 2018 Ole Hickory Pits introduced Squogs, hickory logs that have been milled square like lumber into uniform 3.5 x 3.5 x 12" blocks. They are designed for stick burning pits like the ones they manufacture. They have some real advantages. There is no bark so they are consistent quality, they stack neatly on pallets, and bark is often dirty, flakes off, and hides bugs. Very clever.

Chunks. Wood chunks from golf ball to fist size are fairly easy to find in hardware stores. Chunks burn more slowly that chips, and often a chunk or two about the size of an egg weighing 2 to 4 ounces is all that is necessary for a load of food. Because they are slow, steady sources of smoke, they are in many ways, the most desirable. When you use chunks, you can add one or two at the start of the cooking cycle and you don't need to keep opening the unit and mess with the equilibrium in the cooking chamber's atmosphere.

Chips. About the size of coins, chips are also common and easy to find. They burn quickly and you may find that you need to add them more than once during the cooking cycle. Chips are fine for short cooks, but for long cooks, chunks are better.

Pellets. Pellets are made by compressing wet sawdust and extruding it in long pencil thick rods. They are broken into small bits about 1/2" long. Food grade pellets contain no binders, glue or adhesives, and when they get wet they revert to sawdust immediately. Some smokers use pellets as the main fuel, for both flavor and heat and pellet cookers do very very well in competition. Because they can be fed into the fire in a very controlled manner, usually by an auger, pellet cookers can be regulated with a thermostat, making them very controllable. They burn very hot and clean.

Food grade pellets can be a good source of smoke flavor on grills and smokers for short cooks, and a handful or two is usually all that is necessary for poultry.

Pellets used as fuel to fire pellet grills are mostly oak, a stable burning wood. If they say they are hickory, they are usually less than half hickory, a fact that does not always appear on the label. They usually come in 10 to 40 pound bags.

Placeholder

BBQr's Delight makes a dozen flavors of pellets in small 1/10 pound or 1 pound bags that are 100% flavor wood including alder, apple, cherry, hickory, orange, pecan, and others. Their Jack Daniel's pellets are a mix of oak and charcoal from oak whiskey barrels, and their Savory Herb is oak with herbs in the blend. I love using these products because they are easy to measure and control. They only burn for about 20 minutes at 225°F, so you must get your meat on before the wood.

Click here to learn more about pellet smokers, how they work, and get a link to our reviews of more than a dozen of these new devices..

Placeholder

Bricks. Another form of pellet is the brick, the most notable being made by Mojo-Bricks (right). These are wood chips and sawdust from the mills compressed until they bind. They come in a number of flavors. I have had very good luck with them on a variety of smokers.

Bisquettes. Bisquettes are another variation on the compressed sawdust idea made for the Bradley Smoker. They look like small brown hockey pucks.

Sawdust. Sawdust can also be used for flavor, but it burns quickly and is rarely used. There are even a few small smokers, like the Camerons, that use smoldering sawdust. It can be used effectively on thin, fast cooking foods like fish filets.

For gas grills

Getting smoke on gas grills is sometimes tricky. You need to experiment. On your grill you may prefer the flavor of smoldering chunks or fast burning chips. Taste is a matter of taste. Here are some things to try.

Get a charcoal assist. Sometimes wood just won't burn. A reader, Nei Ng, found a solution: "The first thing to do is to wrap the wood in foil like the wood chip pouches. Make a small pile of charcoal on the flavor bars [or heat dispersers]. They will ignite, but the pile isn't hot enough to really change the overall temperature, and the wood should be lit by the time the grill has reached 225°F. Place the wood over the hot charcoal and it should start smoking within a few minutes."

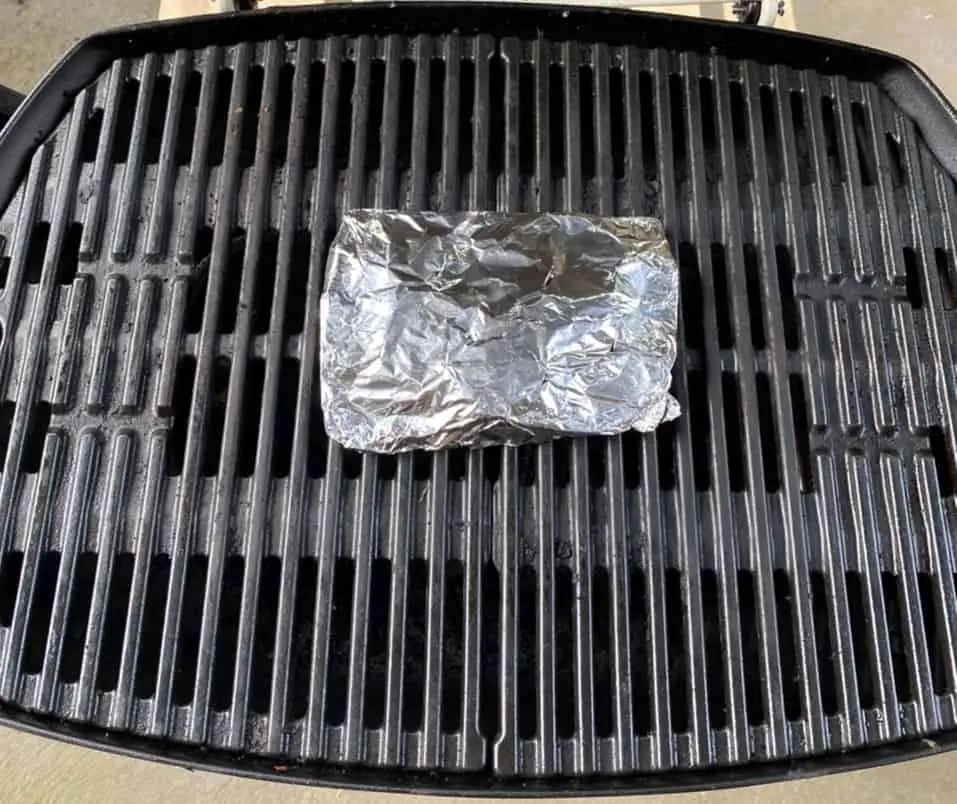
The foil pouch for chips. Put wood chips in a foil pouch or make a smoke bomb (elsewhere on this page). For a pouch, use heavy duty foil or two or three layers or regular foil. Poke holes in the top so the smoke can escape. Place the pouch as close to the heat as possible. Reader Jeff Hale has this tip: "Make up a bunch of pouches in advance. When one is burnt up... throw another one on." You will know when to add a new pouch when the smoke stops. Another option is to use a small aluminum pan with holes poked in the bottom.

If you are having problems getting the wood in a pouch to smoke, before you put the meat on, turn the burner on high, put the foil packet on and wait for the chips to begin smoking. Then dial the burner down so you can get the oven to 225°F. Or try Nei Ng's technique of using charcoal (above).

Try putting the wood in a small cast-iron frying pan or a flattened steel can.

If the wood burns. It is possible that your wood might just catch on fire and not smoulder. Don't worry! Remember, small hot fires prooduce the best tasting smoke. You will use more wood than if you let it smolder, but you may just like the flavor better.

Smoking indoors with sawdust

If you have a good exhaust system smoking with sawdust works well. If you have a wimpy fan, don't even think about it.

The best source of sawdust is to take a handful of wood pellets, get them wet, and either let them air dry or pan dry them on a low temp. You can get quality hardwood sawdust from a local cabinet maker or lumber yard, but often it is mixed with pine and other woods.

Get a stainless roasting pan, cover the bottom with heavy duty foil. Sprinkle sawdust on top and place a layer of foil over it, but not all the way to the edge. This keeps drippings from extinguishing the smoldering wood and allows the smoke to escape around the edges. Place a rack like a pie cooling rack above the sawdust sandwich. The food goes on the rack, and then cover the whole shootin' match. You can make a cover several ways.

  • Lay a second, identical roasting pan upside down on top, and clamp it down with metal or wooden clothes pins.
  • Lay a sheet pan on top of the roasting pan and weight it down with a sauce pan or a brick.
  • You can fashion a lid from foil, just crimp it tight around the edges. Foil is a good method if you need to insert a food thermometer or if the food is tall.

Place the whole shooting match on top of the burners on the stove and crank up the exhaust. When the smoke stops, you can check the meat temp. If it is not done, pop it into the oven at about 325°F.

Meathead's smoke bombs

PlaceholderThis method is ideal for both gas and charcoal cookers when you have a long cook and getting under the grate will be tricky, like when there's a full packer brisket on board.

Get two disposable aluminum loaf pans. Add dry wood to both. Pour enough water in one to cover the wood. The dry pan will start to smoke quickly. About 15 minutes after it is all consumed, the other pan will have dried out and begun smoking.

Getting the correct amounts of wood and water may take you a few cooks to perfect, but you will figure it out. I can tell that much about you.

Smoking with herbs

We have a nice herb garden and at the end of the season there are always a few unpicked oregano, basil, and other herb bushes. I cut them above the roots, and stick them in paper bags to dry. Then I crumble them, and I throw them on the grill after the meat is on. They burn fast, put out a lot of smoke that smells like you are doing something illegal, and add an exotic aroma to the food. I use them mostly on my gas grill on seafood, which cooks quickly and doesn't have time to absorb slowly smoldering hardwood.

Tea smoking

Chinese cooking often calls for tea smoking. Make a foil packet of these ingredients and place it under the meat.

1/4 cup tea leaves
1/4 cup brown sugar
1/4 cup rice
zest of 1 orange
6 whole star anise pods
2 (3" long) cinnamon sticks
1 tablespoon powdered ginger

Bottom line

Sterling Ball is a champion pitmaster whose trophies include the Kansas City Royal Invitational also owns a guitar string business. He describes the art of making tasty smoke as similar to tuning a guitar. "You need control of your instruments, the pit, fuel, oxygen, fire, and heat. And you need to practice."

The form you have selected does not exist.

Filed Under: Smoker Tagged With: Smoking Woods, TaTu BBQ

How to Make a Bacon Weave

June 8, 2020 By Boucanier Leave a Comment

How to Make a Bacon Weave

April 13, 2020

Learning how to make a bacon weave is simple and the uses are endless! Use bacon weaves on meatloaf, turkeys, vegetables, and more to add flavor and moisture.

image of a finished bacon weave

What is a Bacon Weave?

Ah, the bacon weave. Not only is it a thing of unparalleled beauty, but it is also a functional and unbelievable tasty tool to have in your culinary toolbox. A bacon weave is essentially interwoven strips of bacon that can be used to add flavor, moisture, or structure to meat or vegetables.

It’s much simpler to create than it may appear. Just a slab of beautifully sliced bacon (homemade if you like), some parchment paper, and a few minutes of your time is all it takes to master this piece of meat art. So what are you waiting for? Grab some bacon and start weaving.

8 step collage of making a bacon weave

How to Make a Bacon Weave

  • Step 1: Layout 5 (or 6, depending on how big your bacon is) pieces of bacon on a sheet of parchment paper. Don’t skip the parchment paper! This makes it so easy to transfer your bacon weave wherever you need it when you’re finished.
  • Step 2: Fold back just the ends on 2 of your pieces of bacon. Make sure to skip a piece of bacon in between each piece that you fold back. This creates the “over and under” weave you’re looking for.
  • Step 3: Lay another piece of bacon across the pieces of bacon that weren’t folded back. Unfold the pieces of bacon over the new piece of bacon and voila! You’re first woven piece! Ain’t she pretty!
  • Step 4: This time, fold back the ends of the 3 pieces of bacon that you skipped during Step 1.
  • Step 5: Lay down another piece of bacon and unfold the 3 pieces you folded back.
  • Step 6: Repeat until you have woven all 10 pieces together.

That’s it! Your weave is complete. Since you were so smart and made your weave on parchment paper, you’re now free to carry it anywhere and roll that piece of art onto anything that needs a blanket of bacon (which is pretty much everything, amIright?!)

What is the best bacon to use?

I recommend using thinner sliced bacon when making bacon weaves. Thick bacon has a tendency to get chewy and rubbery in the portions of the weave where it is covered by another piece of bacon. Thinner bacon allows the fat to render more quickly, meaning more of your bacon gets cooked through without getting tough.

Collage of images with each photo showing a recipe with a bacon weave

Recipes Using Bacon Weaves:

For the bacon lovers among us, I’ve created several recipes that utilize bacon weaves to season, moisturize, and hold things together. Consider a bacon weave the duct tape of BBQ.

BBQ Meatloaf with a Bacon Weave
Green Chile Pork Fatty
Bacon-Wrapped Smoked Cabbage
Triple Pork Breakfast Fatty
The Big Fat Fatty Burger
Bacon-Wrapped Turkey Breast

Bacon Weave Instructions

Follow the instructions below, and I’ll teach you the simple steps to making a wimple bacon weave. If you’re looking to make better BBQ, so you can feed the people you love, and become a backyard BBQ hero, join my members-only group The Grill Squad for full access to all my meat, rubs, sauces, and meat buying masterclasses, exclusive podcasts, and so much more.

Making dinner for your family should be easy, and Hey Grill Hey is here to help! Over at Patio Provisions, we have sauces, rubs, and more to save you time and energy when making something for an upcoming get together. Check it out today!

Uncooked bacon slices in a weave
Print Recipe

How To Make a Bacon Weave

Step by Step instructions for making a bacon weave at home. Perfect for wrapping meatloaves, sausage rolls, and more!
Cook Time15 mins
Total Time15 mins
Course: Side Dish
Cuisine: American
Keyword: Bacon Weave
Servings: 1 bacon weave
Author: Susie Bulloch (heygrillhey.com)

Equipment

  • Parchment Paper

Ingredients

  • 10 slices bacon

Instructions

  • Build the base. Layout 5 pieces of bacon on a sheet of parchment paper. The parchment paper makes it easy to transfer your bacon weave wherever you need it when you're finished.
  • Fold alternating pieces of bacon. Fold back just the ends on two of your pieces of bacon. Make sure to skip a piece of bacon in between each piece that you fold back. This creates the "over and under" weave you're looking for.
  • Weave your first piece of bacon. Lay one piece of bacon perpendicular across the pieces of bacon that weren't folded back in the previous step. Unfold the two ends of the bacon over the new piece of bacon and voila! You're first woven piece!
  • Weave your second piece of bacon. Fold the ends of the three pieces of bacon that you skipped during Step Two back over the first weave you just made, leaving 2 pieces of bacon flat on your parchment paper. Lay another piece of bacon perpendicular on top of those 2 remaining pieces of bacon. Return the 3 folded pieces of bacon to their original position over the top of the piece you just laid down. You should have a second woven piece of bacon.
  • Repeat until completed. Follow the pattern of folding back alternating pieces of bacon (skipping a piece in between), laying down a new perpendicular piece on top, and returning the bacon until your weave is complete.
  • Tighten your weave. Use your fingertips to slide the pieces of bacon closer together to tighten your bacon weave. Bacon will shrink when cooked, so starting with a tight weave is important.
  • Transfer your weave. Use the parchment paper to transfer your bacon weave to whatever food you desire to top with a weave of bacon!

**This post was originally written in January 2016, but it has been updated with more information.

Filed Under: BBQ Recipes Tagged With: Bacon, BBQ Bacon Weave, TaTu BBQ

Baked Beans are good for you

June 7, 2020 By Boucanier

This is why you should be serving your family baked beans for dinner

They're a pantry staple, but they pack a punch in the nutrition department.

Piled high on a baked potato, or severed on the side with eggs and toast - baked beans are a quick weeknight meal in many households. But just how nutritious are baked beans for you and your family? And while we're asking the big questions, what beans are in baked beans? And, are baked beans baked?
Baked beans are an international food. Versions of baked beans are found across the globe from France, home of the cassoulet, through to the USA where Boston baked beans rein (scroll down for an super quick and easy Boston baked beans recipe).
Despite being called "baked" beans, they are most commonly stewed in a tomato sauce. Canned baked beans are usually made from haricot beans, also known as navy beans.
So, what other questions do we have about baked beans?

Are baked beans healthy?

From being high in fibre to high in protein - there are many reason why baked beans are healthy.

  • A cup of baked beans is a great source of protein with more than 10 grams of protein equal to 50 gram steak or 11/2 eggs.
  • Baked beans contain energy giving, low glycaemic index carbohydrates.
  • Baked Beans count as a vegetable serve. A cup of baked beans is equal to more than 1.5 serves of vegetables.
  • Most baked beans are also an excellent source of tomato containing the antioxidant lycopene.
  • Baked beans contain folate a vitamin essential to release the energy in our food. One cup of Baked Beans provides more than 25% of the daily requirement (RDI 400 micrograms/day adults and teenagers).
  • The fibre in a cup of baked beans is 12 grams equal to more than 8 large sandwich slices multigrain bread, or 11/4 cups toasted muesli or 4 medium unpeeled green apples.

Are baked beans high in fat?

Quite the opposite!

  • Baked beans are low in fat (less than 1%) with less than 2 grams of fat per cup. They are super low in saturated fats.
  • A cup of baked beans is about 900 kilojoules or just less than 10% daily intake energy requirement for the average person

Do baked beans give you gas?

  • Unfortunately, it is true. Baked beans give you gas. This is because we do not have digestive enzymes for all carbohydrates including raffinose found in dried beans and legumes. Gut micro-flora break down this carbohydrate and a byproduct of this process is gas. However, raffinose can be reduced in beans that are soaked first and the water discarded.

Super quick and easy Boston Baked Beans recipe

INGREDIENTS
15g butter
2 chorizo sausages, thickly sliced
1 onion, chopped
420g can baked beans
400g can diced tomatoes
2 tbsp maple syrup
2 tbsp worcestershire sauce
1 tsp tabasco or chili sauce
thick toast, to serve

METHOD
1. Melt butter in a large saucepan on high heat. Saute chorizo and onion for 1-2 minutes or until onion is tender.
2. Stir in beans and tomatoes. Bring to the boil, stirring. Blend in maple syrup and sauces.
3. Reduce heat to very low to keep warm. If liked, sprinkle with parsley, then some with toast.

The recipe first appeared on Food To Love.

READ MORE FROM

/assets/images/headerlogos/AWW-logo.svg

Filed Under: BBQ Sides Tagged With: bbq baked beans

Best Wood For Smoking

June 6, 2020 By Boucanier

Ultimate Guide To The Best Wood For Smoking In 2020

  • Blake Dan
  • May 24, 2020
  • No Comments

Along my barbecue journey I’ve had great successes and great failures using different types of wood. When it works out like you hoped it would it really is a proud moment. Pairing wood flavors with each particular meat can really be more of an art than a science, and personal preference definitely comes into play.

In saying that, once you’ve practised smoking a meat a few times, finding the right wood with the right properties and flavors can really lift the smoking game to the next level. Before looking at flavors it’s good to understand the fundamentals behind smoking wood.

What Happens When Wood Burns?

When wood is exposed to heat its compounds go through a series of changes. The process of burning wood goes through dehydration, vaporization, ignition and combustion, and finally char burning. During each of these stages the compounds within the wood react.

The composition of the wood used for smoking, dried hardwood, is made up on average of around 5% water, 40% cellulose, 40% hemicelluloses, close to 20% of lignin, and the remaining 1-ish% are minerals. These percentages vary depending on the wood species and subspecies, as well as more general variables such as age & climate.

The cellulose and hemicellulose are made up of carbohydrate sugars. Lignin is a compound found predominantly in the cell walls, which gives the wood its strength. The common minerals found in wood are usually traces of potassium, sodium, and sulphur, but can differ depending on the wood itself.

When the wood begins to smoke, the minerals and molecules in the reaction give off the classic smoky aroma and flavour.

Burning Wood In Barbecue

The Four Stages Of Burning Wood

Stage 1: Dehydration

Dehydration, the first out of four stages of burning wood, occurs at varying temperatures, up to about 500°F. Before the wood can start to burn, the moisture must evaporate until the wood is dry enough to combust. In order to evaporate the water must absorb heat until it rises in temperature enough to turn from liquid to gas.

During this time the wood isn’t actually providing any heat, but is actually absorbing it from the fire.

Stage 2: Vaporization

As the temperature rises above around 450°F to 540°F, and the wood has been heavily dehydrated, the hydrocarbon compounds within the wood begin to break down and vaporize. This process is referred to as pyrolysis. The complex process of pyrolysis releases combustible byproducts, made from hydrocarbons in the form of a light fog or tar.

Heat is still absorbed during this process, but as the heat rises past this stage, these compounds begin to combust and release heat.

Stage 3:Ignition and Combustion

Combustion  begins between 540°F and 1225°F, but can vary depending on the wood species and also how much oxygen is available to ‘feed’ the flames.

As the wood burns it’s carbon molecules react with the oxygen, and the combustible gas carbon monoxide is made. If there is enough oxygen available, this carbon monoxide forms carbon dioxide. Combustion of wood in this way produces water vapor, carbon dioxide, heat, and the remaining non-combustible compounds are left as ash.

This is the most important stage of burning wood when it comes to cooking. Flame and smoke are present, and one of the byproducts, nitric oxide, plays a huge part in the overall smoking of the meat.

The aromatic qualities of the smoke come from guaiacol and syringol, and the best temperatures to optimise the traditional smokey and accompanying flavours is around 650-750°F

Stage 4:Char Burning

Charcoal begins to form once the majority of the organic and combustible compounds have reacted with the heat and burned off. Carbon is the remaining element, and it is able to burn with little or no flame, which is why you see it glowing red hot without any flames! Charcoal makes a great fuel for grills and smokers, and can exceed temperatures of over 1100°F.

Note: These stages can all be happening at the same, progressing in different parts of the wood as it burns

How Fuel Type Impacts Flavor

Cooking with heat from wood, charcoal, gas, pellets, or electricity produces distinctly different flavours. This is because each fuel type adds different properties to the combustion byproducts. The actual smokey and unique flavour of barbecue always comes from the smoke produced by the wood, either using wood logs, chunks, chips, or pellets. But, each fuel type contributes different compounds while heating the wood.

Gas

Both natural and propane gas are common fuels for the everyday grill or smoker. The gas when exposed to air combines with oxygen and can be ignited producing water vapors, and carbon dioxide and carbon monoxide. This naturally doesn’t add a flavour to the meat while cooking.

This is where wood chips can be used, being able to add flavours from the minerals and compounds within the wood as it burns and turns to smoke. The juices that drip off the meat while it cooks can also turn to steam and return as moisture back into the meat to flavour it.

Charcoal

Charcoal, being of almost pure carbon from the burning wood, burns much hotter than the wood itself. Up to temperatures exceeding 1100°F. Like when burning wood, charcoal produces combustion byproducts. Although less than burning wood, these byproducts add the smokey and unique tastes of barbecue and the essence of the wood itself.

Charcoal is arguably one of the best and most popular traditional fuels to use to grill and smoke meat because of these properties.

Electric

Cooking using electricity relies on the strong heat that comes from a metal coil. This means there is no flame at all, and therefore no added flavors or minerals. However, you can still find success by using wood chips, but less powerful smoky flavor overall.

Types Of Wood

The best woods for use in cooking and smoking is dried hardwood. These hardwoods include fruit and nut woods, which impart fruity, nutty, or sweeter smokey flavours.

Softwoods, like pine, redwood, and other coniferous/evergreen trees are not recommended for cooking as they have a strong pungent sap and burn very quickly.

Overview Of The Most Popular Wood Flavors

Apple
  • Flavours: Mild, sweet and fruity flavor
  • Recommended for: Pork
  • Not Recommended For: Beef
Cherry
  • Flavours: Sweet and fruity. Can pair great with oak
  • Recommended for: Beef, poultry, or pork
  • Not Recommended For: Fish
Hickory
  • Flavours: All-rounded, strong smokeyness, and bacon-like
  • Recommended for: Beef, poultry, or pork
  • Not Recommended For: Fish
Maple
  • Flavours: Mild and sweet
  • Recommended for: Pork
  • Not Recommended Fish
Mesquite
  • Flavours: Very strong smokey flavour. Bust used in open-air
  • Recommended for: Beef or poultry
  • Not Recommended For: Pork or fish
Oak
  • Flavours: Medium smokey flavour
  • Recommended for: Beef
  • Not Recommended For: Fish
Pecan
  • Flavours: Mild and nutty
  • Recommended for: Beef, poultry, or pork
  • Not Recommended For: Fish


Apple

Apple is a popular choice and is a classic smoking wood. It’s very versatile, and delivers a mild, sweeter and fruity flavour. Most of the time it’s paired with things like ribs, fish, vegetables. It doesn’t provide the strongest smokey flavour, but its other flavors compliment the smokey and savoury flavors of the meat well.

Cherry

Cherry wood is known to burn very hot, giving off a good amount of smoke. It provides more of a mild smokey taste. It’s quite sweet, and fruity. Cherry works very well when blended with a wood that has a stronger smokey flavor, such as oak.

Hickory

Hickory is definitely one of the most popular smoking woods. It’s famous for providing a solid smokey flavour with a distinct bacon-like profile. Hickory is an all-rounded and strong smokey wood, recommended use on everything except fish, and delivers a particularly delicious flavor to beef, pork, or poultry.

Maple

Maple is a mild smoking wood, which isn’t overpowering. It’s a very popular option for vegetables, poultry, and pork. It’s quite sweet which is great to pair with savoury rubs and seasonings. If you like the sweet essence but want more of an oomph, it can be blended with other woods such as oak.

Mesquite

Mesquite is known to be a very potent and strong flavored smoke. It burns hot and quickly, and let’s off a very high amount of smoke. Mesquite isn’t recommended for closed smoking, as it can quickly overpower the meat and leave a bitter and unpleasant taste. In the right doses, or used in open-air grilling or smoking it can however, pack a strong smokey punch.

Oak

Oak yields a medium smokey flavour, that doesn’t tend to overpower meats. It doesn’t have any sweet, fruity, or nutty flavors and tends to hero the smokiness. The smoke is very consistent and clean. It does work very well blended, as you can deliver a solid smokiness from the oak, and pair it with a fruity, or sweeter wood for a different flavor profile.

Pecan

Pecan is a favourite for those that enjoy a nutty smoke that doesn’t overpower the food. It’s slightly sweet, and provides a great solid smokey taste. It is able to work it’s magic a lot quicker than other woods too, which makes it a great choice for shorter cooks. However, If using it for longer smokes it still won’t overpower the meat.

Best Wood For Smoking Different Meats

Quick Overview:

Wood Chart Smoking

Best Wood For Smoking Pork

Pork has a naturally salty taste, and most cuts are quite lean. Most woods actually work well with pork, and therefore personal preference to which flavor you lost most comes into play. Pork pairs very well with sweeter or fruitier flavors. This is why you may see a lot of great pork dishes accompanied by apple, plum, or other sweet sauces.

When smoking, apple and maple are both top picks due to their flavor pairing and mild smokiness. However, if you prefer a stronger smoke then oak can be utilised by itself, or even mixed with your favourite sweet wood.

Best Wood For Smoking Pork Ribs

barbecue pork ribs

Pork ribs have different composition and distribution of fat and meat than other pork cuts. Although you can certainly use oak, apple, or maple, a dream pairing is actually using hickory. Hickory brings an all-rounded, smokey but bacon-like sweetness that enriches the overall flavour of the ribs.

Best Wood For Smoking Brisket and Beef

Homemade Smoked Barbecue Beef Brisket

Beef, including beef brisket, has a uniquely savoury and rich flavour. For this reason, lighter smoking woods tend not to deliver a large enough smokiness to make a great impact on the overall flavour profile. Smoking wood is down to personal preference however, so if you prefer a more subtle smokiness then lighter smoking woods such as apple, cherry, or pecan can still go well.

In saying that, smoking brisket or other beef cuts using oak is our top pick. Oak burns well over longer time periods which is ideal for when cooking brisket low and slow. It has a prominent smokiness, but won’t overpower brisket or beef and won’t leave bitter undertones as it compliments the rich savoury flavor.

If you do like a little bit of sweetness, oak also blends very well with apple or cherry to deliver a sweetness to the exterior of the meat. This can be a prime choice if you aren’t using a naturally sweet rub too.

Best Wood For Smoking Chicken

Chicken provides a great flavor canvas that you can really get creative with. It’s a very forgiving meat when smoking. Apple and cherry woods go a long way with chicken, but overall hickory delivers the best traditional barbecue flavor.

Usually when smoking with hickory, over longer times you are sometimes left with a more bitter taste on the skin. Therefore, it will work more ideally on shorter cooks, such as on chicken wings, legs, or breasts.

If smoking the whole bird over a longer period of time, you could consider using lighter smoking woods such as apple, or cherry. If you’re a fan of the traditional barbecue flavor, oak is a very viable option, and is certainly the overall best wood for smoking chicken wings.

Best Wood For Smoking Turkey

Turkey on a smoke grill

Turkey is one of the most glorious meats to serve up at Thanksgiving, Christmas, or any gathering. If done correctly, it can be wonderfully smoked. Similarly to chicken, you really can get creative with it’s flavor profile – but it does naturally pair well with lighter, sweeter, and fruitier woods.

For this reason, the best wood for smoking turkey is either maple, if you prefer a subtle smokiness and sweetness, or oak if you prefer a stronger smoke without it being overpowered. Oak is a safe and consistently great option as it’s ideal for longer smokes.

Best Wood For Smoking Fish

Traditionally fish, such as with salmon and tuna, is best smoked using a mild wood. You want to be careful to not over-smoke fish, as it will quickly overpower it, and can cause more harm than good. Therefore, using a wood like alder which tends to not burn as hot as other woods, will do the trick to impart a subtle smokey flavor.

Best Wood For Smoking Vegetables

Depending on the vegetable, there will be more or less suitable options. However, you can’t go wrong with delivering a medium smokey flavour, so that you won’t overpower the natural flavors. For this reason one of the most common and promising woods to use is actually maple. It helps the vegetables sweetness shine, and delivers a nice notable undertone of smoke.

Wood Shapes And Sizes

smoking Chips

Most modern smokers come specialised to smoke using one type of wood size, such as with pellet smokers. Electric and gas smokers usually require wood chips. It’s important to know that the different sizes and types of wood do have different combustion properties, and influence flavors differently.

Logs

Logs are the most traditional way to grill and smoke, often used in open style pits, or for larger spit roasts. Although not used as often in modern times, they are still viable if you have the right pit or apparatus to control the flame and smoke.

Wood Chunks

Wood chunks are essentially logs that have been broken down into smaller chunks. Sometimes they can be treated, but dried natural hardwood chunks are always best. Wood chunks are great to use if your smoker can accommodate them. They have great temperature control as they burn more slowly than chips and pellets, but don’t require the same high temperatures that full logs need to produce a great smoke.

Wood Chips

Chips are made for use in electric, gas, portable, or smaller smokers. Although they don’t often produce as much smoke as wood chunks they certainly still do the trick. They can also be used on a charcoal or gas grill to convert it to a smoker using indirect heat.

Using a charcoal grill, you can safety pile the charcoal on one side and add wood chips. On the other side you can place the meat so that it isn’t being cooked directly over the heat.

Using a gas grill you are able to make a foil package with wood chips inside it with holes poked through to allow it to smoke. Place the foil package in the centre, use one burner to provide heat and allow the wood to begin smoking, and place the meat on the opposite side so it can cook, again, using indirect heat.

Converting a gas grill to a smoker using wood chips & indirect heat

Wood Pellets

Wood pellets are specialised for use in a wood pellet smoker. These smokers usually have automatically controlled hoppers that feed the desired amount of wood pellets to keep a consistent temperature and smoke. High quality wood pellets are carefully constructed by compressing wet sawdust into the pellet shape. When they dry they remain together and not crumble, which helps it burn at a consistent rate and release a smooth and clean smoke.

Final Words

It’s important not to overthink the process of smoking with wood. To be completely honest, if you’re a beginner it’s much better to stick with a single all-rounded wood such as hickory to learn the fundamentals of smoking meat. There are numerous ways to change the flavors of smoked meat, such as seasoning, rubs and smoking times and temperatures.

Many enthusiasts get too preoccupied with trying to get the best pairing that they fail to master the art of controlling the smoke and temperature. Once you are experienced, choosing the right wood comes more naturally, and you will tend to find your favourite.

Happy smoking everybody!

Share on facebook
Share on twitter
Share on pinterest
Share on email
Share on print
Blake Dan

Blake Dan

Hi! I'm Blake, the founder and content creator of GrillSimply.com. I've been grilling and smoking my whole life and I'm always looking to try new techniques! Let me know if you have any suggestions or tips to share, I would love to hear from you.

Filed Under: Smoker Tagged With: Smoking wood

BBQ Chicken and Apple Bread Pudding

June 4, 2020 By Boucanier

To me, bread pudding is the epitome of comfort food, and it’s simply too good to reserve only for dessert. This sweet and savory twist on the classic is a delicious new way to enjoy an old favorite. —Shauna Havey, Roy, Utah

Test Kitchen Approved
Contest Winner
BBQ Chicken and Apple Bread Pudding

BBQ Chicken and Apple Bread Pudding Recipe photo by Taste of Home

  • Total Time Prep: 45 min. + cooling Bake: 35 min.
  • Makes 8 servings

Ingredients

  • 1 package (8-1/2 ounces) cornbread/muffin mix
  • 6 tablespoons butter, divided
  • 1 large sweet onion, thinly sliced
  • 2/3 cup barbecue sauce, divided
  • 2 cups diced cooked chicken
  • 2 large eggs, beaten
  • 1 cup half-and-half cream
  • 1 teaspoon salt
  • 1/2 teaspoon pepper
  • 1-1/4 cups shredded Monterey Jack cheese
  • 1 small green apple, peeled and diced
  • Minced chives

Directions

  • Prepare cornbread according to package directions and bake using a greased and floured 8-in. square baking pan. Cool. Reduce oven setting to 375°. Meanwhile, in a small skillet, heat 2 tablespoons butter over medium heat. Add onion; cook and stir until softened. Reduce heat to medium-low; cook until deep golden brown and caramelized, 30-40 minutes. Remove from heat and set aside.
  • Pour 1/4 cup barbecue sauce over chicken; toss to coat.
  • Cube cornbread. Microwave remaining butter, covered, on high until melted, about 30 seconds. Whisk in eggs, cream, salt and pepper. Add caramelized onions. Pour egg mixture over cornbread cubes. Add chicken, cheese and apple. Toss gently to combine.
  • Pour mixture into a greased 8-in. square or 1-1/2-quart baking dish; bake until bubbly and top is golden brown, about 35 minutes. Drizzle remaining barbecue sauce over bread pudding. Sprinkle with chives.

Test Kitchen tips Make-ahead tip! Bake the cornbread ahead of time, or just buy some from your local bakery. You can also use leftover muffins, bread or rolls in place of the cornbread.

Nutrition Facts

1 serving: 465 calories, 25g fat (13g saturated fat), 156mg cholesterol, 1028mg sodium, 37g carbohydrate (19g sugars, 3g fiber), 21g protein.

https://www.tasteofhome.com/recipes/bbq-chicken-and-apple-bread-pudding/

Filed Under: BBQ Recipes Tagged With: BBQ Sides, Carolina BBQ Red Sauce

Bisquick Drop Biscuits (Yeast-Free Bread)

June 1, 2020 By Boucanier

This simple Bisquick drop biscuits recipe fills your kitchen with the decadent aroma of moist fluffy oven-fresh biscuits in twenty minutes flat.

February 18, 2020 By Kathleen | Leave a CommentThis

One of the most famous Bisquick recipes has got to be this Bisquick drop biscuits recipe. It makes soft fluffy biscuits in about 20 minutes. Save your voice and let the warm doughy fragrance of homemade biscuits wake the fam on the weekend. They’ll come through the kitchen with a smile on their face eagerly anticipating the results of your tasty Bisquick breakfast recipes!

These wholesome Bisquick drop biscuits can be the best part of a nutritious breakfast or you can use them to dress up dinner. These babies will make you famous!

Apron up and let’s bake some biscuits.

Bisquick drop biscuits in a basket

What I Love About This Recipe

I love that our drop biscuits is a simple wholesome recipe that tastes like a million bucks. When you put those moist tender biscuits on the table, your meal is automatically transformed into a wholesome delicious experience that makes memories.

Here are some other great reasons for you to love this recipe too.

  • Moist tender flakey biscuits that taste incredible
  • Transform your meal into a delicious experience
  • Super simple recipe ready in under half an hour
  • No crazy gadgets or hard to find ingredients
  • Make-ahead magic great for meal prep
How to make Bisquick drop biscuits, cold butter cut into small cubes

How To Make Bisquick Drop Biscuits Recipe

Making drop biscuits starts with whisking together the dry ingredients and cutting in the butter. Blend in milk just until combined and drop onto ungreased baking sheet. Could it be any simpler?

How to make Bisquick drop biscuits, prepared ingredients+

Recipe Notes

This is so easy to make. Here’s a few easy tips to make sure they come out just like you want them to.

For tender fluffy Bisquick drop biscuits, you’ll want to combine the dry ingredients separately. This is the best way to keep them from being tough like hockey pucks because mixing develops gluten. Combining dry ingredients first ensures even dispersion which requires less mixing when wet ingredients are added so biscuits come out soft and fluffy.

It’s also important to keep your butter cold, even though it’s cut into tiny pieces. It needs to be in a solid-state as it’s dispersed into the dough to get tender biscuits with the right texture.

How to make Bisquick drop biscuits, whisking flour mixture and adding butter

Ingredient Notes

You’re gonna’ love the short sweet ingredient list. Just a trusty few kitchen staples and you’re off to the races!

Bisquick – I just use the Original Bisquick here, that way I don’t need any flour. It just makes the best biscuits.

Baking Powder – The little extra baking powder helps the biscuits rise nice and fluffy.

Sugar – Add just a tad of sugar to your biscuits to help concentrate the flavor.

Butter – I find that unsalted butter works best in this recipe.

Milk – Milk is your wet food item to help make your Bisquick biscuits moist and hold them together.

How to make Bisquick drop biscuits, adding milk to the flour and butter mixture

Storing Tips

Storing your Bisquick drop biscuits recipe is like trying to hide cookies form the kiddos. They’re not gonna’ last long. However, feel free to toss them in a resealable bag.

They should cool completely first and it’s best if you squeeze excess air out of the bag to keep your drop biscuits from drying out. I typically put mine in the fridge.

How to make Bisquick drop biscuits, mixing the dough and arranging it in the baking sheet

Can You Freeze Them?

Nothing beats a warm yummy biscuit and these little babies are perfect for make-ahead magic! You can absolutely freeze this. I like to wrap mine individually before tossing them in the freezer bag. Then I can pull them out as needed.

How to make Bisquick drop biscuits, baked biscuits on a baking sheet

Make Ahead Tips

Sometimes I like to get the dough ready to go so that I can bake fresh drop biscuits any time I want. Just put these little babies on a prepared baking sheet and then toss it in the freezer instead of the oven. It’s a good idea to gently cover with plastic wrap.

After they harden you can pull your tray out and store them in a freezer-safe bag. You’ll be able to go straight from the freezer to the oven whenever the mood strikes.

How to make Bisquick drop biscuits, brushing melted butter on top of biscuits

How Long Can You Keep This In The Fridge?

This only makes 6 biscuits so you’re not likely to have any leftovers once the fam tastes them. But, if you happen to make a double batch, these little gems will stay good in the fridge for up to a week. Just be sure to let them cool completely before tossing them in the fridge.

Bisquick drop biscuits in a basket

Recipe Variations

Bisquick is one of the all-American staples because it’s just so flexible! It brings the ultimate convenience to recipes like these Bisquick drop biscuits recipe. It’s homemade with a little help!

What Other Breakfast Dishes Can I Make With Bisquick?

Bisquick drop biscuits can go with just about any meal of the day but I think breakfast is my favorite. Bisquick pancakes and Bisquick waffles are an easy way to make breakfast special and add that personal touch.

When I’ve got family coming to town, Bisquick breakfast casserole is an easy delicious way to get breakfast or brunch on the table. I’ve even made it for dinner. I  just love breakfast for dinner!

Bisquick drop biscuits cut in half

Save Recipe!

Bisquick drop biscuits in a basket

Print RecipePin Recipe Rate this Recipe

Bisquick Drop Biscuits

This simple Bisquick drop biscuits recipe fills your kitchen with the decadent aroma of moist fluffy oven-fresh biscuits in twenty minutes flat. Prep Time10 minsCook Time10 minsTotal Time20 mins Servings: 6 Biscuits Author: Kathleen

Ingredients

  • 2 1/4 cups Original Bisquick mix

2 teaspoons baking powder1 teaspoon granulated sugar1/3 cup cold unsalted butter, cut into small cubes2/3 cup milk3 tablespoon melted unsalted butter

Instructions

  • Preheat oven to 450 degrees.
  • In a medium mixing bowl whisk together Bisquick, baking powder, and sugar.
  • Toss butter cubes with Bisquick mixture to coat. Using a pastry blender or 2 knives, cut in butter
  • Add milk and beat just until combined and a soft dough forms (do not over mix or biscuits will become tough.)
  • Drop by the heaping tablespoonful onto ungreased baking sheets 2 inches apart. Bake in preheated oven until tops are golden, about 8-10 minutes.
  • Brush with melted butter and serve.

Nutrition

Serving: 1biscuit | Calories: 354kcal | Carbohydrates: 31g | Protein: 5g | Fat: 24g | Saturated Fat: 12g | Cholesterol: 46mg | Sodium: 589mg | Potassium: 244mg | Fiber: 1g | Sugar: 7g | Vitamin A: 534IU | Calcium: 174mg | Iron: 1mg Save Recipe! DID YOU MAKE THIS RECIPE? I’D LOVE TO SEE!Tag @GonnaWantSeconds or #gonnawantseconds on Instagram! © Gonna Want Seconds. Content and photographs are copyright protected. Sharing of this recipe is both encouraged and appreciated. Copying and/or pasting full recipes to any social media/website/blog is strictly prohibited.

Bisquick drop biscuits in a basket

More Bisquick Breakfast Recipes

There are so many Bisquick breakfast recipes, it’s hard to name them all! I love how versatile and delicious these Bisquick drop biscuits are, but I use Bisquick for all kinds of stuff. Here are some of my favorite Bisquick recipes for you to try.

  • Bisquick Banana Bread – Just like grandma used to make!
  • Bisquick Cinnamon Rolls – Fantastic Sunday morning treat!
  • Bisquick Muffins – Quick, easy and delicious.
  • Bisquick Scones – The perfect companion for that hot beverage.
  • Bisquick Blueberry Muffins – So good they deserve their own category.

More Yeast-Free Bread:

  • Lemon Zucchini Bread
  • Apple Bread with Pecan Praline Glaze
  • Banana Bread
  • Bisquick Banana Bread
  • Bisquick Biscuit

Conclusion

This Bisquick drop biscuits recipe is practically indispensable. It’s a totally delicious versatile recipe that’s great for meal prep. Plus, it goes from oven to table in 20 minutes.

These moist fluffy drop biscuits can take any meal to the next level. Add a savory treat to breakfast or make dinner a little more decadent.

This recipe is practically one of the vital kitchen staples you won’t want to be without!

Baked, Bisquick, Breads, Breakfasts, Fall, Spring, Summer, Under 30 Minutes, Winter

Filed Under: BBQ Sides Tagged With: BBQ Sides, Biscuits

9 Tomato Sauce Variations

May 15, 2020 By Boucanier

9 Tomato Sauce Variations

Keep this handy

Mark Bittman
Photo: Romulo Yanes

You can whip up a batch of tomato sauce from scratch in the time it takes to boil water and cook pasta. Diced tomatoes are super convenient, whether in cans, cartons, or jars. Just don’t buy crushed tomatoes or tomato puree, which are both much too watery.

Canned whole tomatoes will give you an even meatier sauce and are easy enough to deal with: First, drain off the liquid from the can and save it; you may need it to thin the sauce. Don’t bother to core them, but do use a knife to hack away at the tomatoes right in the can to break them up a bit.

Try one of these variations on the main tomato sauce recipe, below.

Tomato Sauce with Fresh or Dried Herbs

Stir any of the following herbs into the sauce just before serving: ¼ to ½ cup chopped fresh basil, parsley, dill, or mint; 10 fresh sage leaves; 1 tablespoon chopped fresh rosemary, oregano or marjoram (or 1 teaspoon dried); 2 teaspoons chopped fresh thyme (or ½ teaspoon dried); or ½ teaspoon chopped fresh tarragon (or ¼ teaspoon dried).

Vegetable-Tomato Sauce

Chop up whatever leftover vegetables you have and warm them up in the sauce just before serving. If you don’t have anything handy, chop 2 cups raw eggplant, zucchini, cauliflower, broccoli, or bell peppers. In Step 1, cook them alone in the oil until the vegetables are soft and tender, 10 to 15 minutes; add more oil to the pan if it starts to look too dry. Remove the vegetables with a slotted spoon, then add the onion to the pan and continue with the recipe. When the sauce is almost done, stir the vegetable back in just long enough to heat through.

Spicy Tomato Sauce

Known as arrabbiata. Skip the onion and put 1 tablespoon chopped garlic in the oil along with 1, 3, or 5 small dried red chiles or a big pinch of crushed red pepper. Cook, stirring, until the garlic is brown — deeply colored but not burned — then turn off the heat for a minute, add the tomatoes, and proceed. Remove the whole chiles before serving.

Tomato Sauce with Fresh Mushrooms

Cook 1 pound sliced trimmed mushrooms (any kind) along with the onion until they shrink and all their liquid evaporates, 5 to 10 minutes; then add the tomatoes and proceed with the recipe.

Cheesy Tomato Sauce

Right before serving, stir in 1 cup cubed fresh mozzarella cheese or use ½ cup ricotta or goat cheese for a creamier, milder sauce.

Puttanesca Sauce

Skip the onion and put about 1 tablespoon chopped garlic in the oil along with a few oil-packed anchovies. Mash the anchovies a bit as you stir; wait to add salt until the sauce is done. Just before adding the tomatoes, stir in 2 tablespoons drained capers, a pinch of red pepper flakes if you like, and ½ cup pitted, oil-cured black olives.

Meaty Tomato Sauce

Start by cooking up to 1 pound ground beef, pork, lamb, chicken, or turkey with the oil and onion until it browns, 5 to 10 minutes, before adding the tomatoes. You can also use sausage; just break it up into chunks as it cooks. Adjust the heat so the meat browns without burning.

Tomato Sauce with Seafood

When the sauce is ready, stir in up to 1 pound peeled shrimp, lump crabmeat, or chopped, cleaned squid, or scallops. Reduce the heat, so it bubbles gently, cover, and cook until the seafood is warmed or cooked through as necessary, 1 to 5 minutes. Or add a 6-ounce can of oil-packed tuna to the pan when you add the tomatoes.

Fresh Tomato Sauce

This takes a few minutes longer to prepare than canned. For a meatier sauce, use Roma (plum) tomatoes; slicing tomatoes have a brighter taste and thinner texture. Cherry tomatoes are fine if you cut them in half and don’t mind the chewiness of the skins, but they’ll never quite come together into the sauce the same way. In any case, figure about 2 pounds per recipe. I don’t bother to peel or seed them, but I do remove the cores. If you want to get rid of the seeds: Cut them in half — lengthwise if they’re Roma; around the equator, if they’re slicers — and gently squeeze out the watery interior. Then cut them into 1-inch chunks and proceed with the recipe.

Now, on to the main recipe.

How to Cook Pasta

Here’s your refresher

heated.medium.com

Pasta with Tomato Sauce

Time: 25 to 30 minutes
Makes: 4 servings

Ingredients

  • Salt
  • 3 tablespoons olive oil, or more as needed
  • 1 medium onion, chopped
  • One 28-ounce can diced tomatoes, including the juice
  • Freshly ground black pepper
  • 1 pound any dried pasta
  • ½ cup freshly grated parmesan cheese, plus more for serving
  • ½ cup chopped fresh basil leaves for garnish, optional

Instructions

  1. Bring a stockpot of water to a boil and salt it. Put the oil in a large skillet over medium-high heat. When it’s hot, add the onion. Cook, stirring occasionally, until soft, 2 to 3 minutes. Add the tomatoes and sprinkle with salt and pepper.
  2. Adjust the heat, so the sauce bubbles enthusiastically and cook, stirring occasionally until the tomatoes break down and the mixture begins to thicken and appear more uniform in texture, 10 to 15 minutes. Taste, adjust the seasoning, and adjust the heat, so the tomato sauce stays hot but doesn’t boil.
  3. When the water boils, cook the pasta until it is tender, but not mushy; start tasting after 5 minutes. When it’s done, scoop out and reserve at least 1 cup of the cooking water, then drain the pasta.
  4. Add the pasta and a splash of the cooking water to the sauce in the skillet and toss to coat, adding a little more cooking water or oil if necessary to create a slightly creamy sauce. Taste and adjust the seasoning and add more oil if you’d like. Then toss with the cheese and the basil if you’re using it. Serve, passing more cheese at the table.
  5. Here’s how to make extra sauce for the freezer: Complete the sauce through step 2, doubling the amounts of oil, onions, tomatoes, and salt and pepper. Let half of the sauce cool and pack it in sealed containers and freeze. Eat within 6 months or so. To defrost, heat it slowly in a pan over low heat, let it sit overnight in the fridge, or microwave it.

— From How to Cook Everything: The Basics

Filed Under: Cooking, Umami Tagged With: BBQ Sauce, Carolina BBQ Red Sauce, Tomato Sauce

Cooking Terms All Chefs Should Know

May 12, 2020 By Boucanier

Cookbook

Prime Publishing LLC

Published by Prime Publishing LLC

View

French Cooking Terms

When you're first learning to cook, the vocabulary can be a little intimidating. Much of the terminology of cooking and baking comes from other languages, which can make the whole process even more difficult (and hard to pronounce).

French cooking terms, in particular, are notorious for being complicated and intimidating. While many of them do refer to techniques that are complex and extravagant, there's a good chance that you've done some of these things without even knowing the name for it. That's why we put together this dictionary of French cooking terms. The next time you come across a term in a recipe that you aren't familiar with, consult this guide, and you'll have your answer in no time.

From bain-maries to hors d'oeuvre, expand your vocabulary and channel your inner Julia Child with these French cooking terms and cutting techniques!

French Cooking and Preparation Techniques

Bain-marie: Also sometimes called a double boiler, a bain-marie is a method of melting chocolate that prevents the chocolate from seizing up. To do this, simply bring water to boil in a small- to medium-sized pot, and then place a glass bowl on top of the pot. In the glass bowl, place the chocolate and the fat that you are using to melt the chocolate (usually butter or coconut oil). Then stir the chocolate until it is completely melted.

Blanche(r): Blanching is a method of preparing and preserving foods -- usually vegetables -- for long-term storage and freezing. This requires boiling the vegetables in water for about 5-10 minutes and then immediately putting the vegetables in a bath of ice water.

Brûlé(e)(r): You've probably seen this word in the past participle form, "brûlée," in crème brûlée. This is the French word for "to burn." In cooking, this usually means with a blow torch.

Learn French Cooking from the Master
Julia Child is credited with bringing tasty French dishes into American homes. If you're looking to try something french, consider one of her classic recipes.

Find our full collection here: 47 Classic Julia Child Recipes

Confit: A confit is a term for slow cooking in oils and fats, like a low-temperature version of frying. "Confit" comes from the French word for "to prepare."

Cuisson: "Cuisson" is simply the French word for "baking" and is used by chefs to refer to the quality of the bake or the cooking process and the skill of the chef. Something that is overcooked or undercooked would not have a good cuisson.

Dégorge(r): A method of removing juices from meat and vegetables (often fish). This method involves salting the meat and then soaking it in water and is usually done to remove strong or overwhelming flavors.

Dépouille(r): Removing the fatty layer of "skin" that appears on the tops of broths, stews, and sauces.

En croute: Refers to food that is wrapped in dough or a pastry and baked.

En papillote: Refers to food that is wrapped in parchment paper or foil so it will cook in its own steam.

Flambé(r): A method of brûléeing food by adding alcohol (usually brandy) and then lighting it on fire to burn out the alcohol.

Fondre (fondue): The French word for "to melt." The past participle form, "fondue" usually refers to melted cheese or chocolate that is used as a communal condiment.

Frappe(r): The French word for "to hit" or "to strike." This word is often used to refer to something that has been put through an ice bath or blended with ice.

Gratin(ée): The French word for "to grill." This word usually refers to a method of browning that involves adding breadcrumbs and cheese to a dish and then browning it in the broiler.

Quadrillage: The method of grilling meat and vegetables to create a grid pattern from the grill marks.

Sauté(e)(r): From the French word for "to jump," sautéing simply refers to the act of flipping a pan to make the ingredients "jump." (Pictured below)

Sous vide: From a French phrase that refers to something in a vacuum, sous vide is a method of cooking that involves sealing food in air-tight plastic containers and submerging in hot water in order to cook the food evenly and thoroughly to prevent burning or overcooking.

Curious About Sous Vide?
Check out our full article on sous vide cooking, how it works, and why you should try it! Learn all about the art of vacuum-sealed cooking. You might even want to try it after exploring sous vide 101. What Is Sous Vide Cooking?

What Is Sous Vide Cooking?

French Cutting and Dicing Techniques

Alumette: A baton-style cut that is thicker than a Julienne but thinner than a Battonet.

Batonnet (or Jardinère): From the French word for "little stick," this style of cutting will give you small batons, like a thick Julienne.

Brunoise: A fine dice, usually made by dicing from an alumette cut. Often vegetables that are cut in the brunoise style are cooked in butter and used for flavoring soups and sauces.

Chiffonade: To cut into fine strips or ribbons.

Concasser: From the French word for "to crush," this refers to a rough chop or crushing, often of tomatoes.

Julienne: A very fine slice, like a thin stick or baton.

Mince: A very fine dice, usually made by dicing from a Julienne cut.

Paysanne: A thick, rustic style of dice, usually made by dicing a thick baton cut.

Rondelle: A round dice.

Can't keep your cutting and dicing terms straight? Check out this handy infographic below. And click here to download the infographic.

Types of Cutting and Dicing

French Terms for Parts of the Meal

Apéritif: A drink, usually alcoholic, that is used to prepare the palate for the meal. These are typically heavy and dry beverages.

Amuse-bouche: A French term that means "mouth tease," an amuse-bouche is a kind of appetizer.

Dégustation: A series of small courses, like samplings.

Digestif: The opposite of the apéritif, a digestif is a drink, usually alcoholic, served after the meal. These are often lighter, sweeter dessert wines that are said to help with digestion.

Entrée: From the French word for "entrance," this term used to refer to the course that would "introduce" diners, so-to-speak, to the main course. Now this word commonly just refers to the main course of the meal.

Entremet: The French word for "interlude" or "intercede," this refers to a small dish, usually a dessert besides a pastry, that is served between courses as a way to cleanse the palate.

Hors d'Oeuvre: A type of appetizer. The French phrase means something that's outside of one of the main courses of the meal.

Filed Under: Cooking Tagged With: Cook School, French Terms

7 Of The Oldest Recipes In History

May 11, 2020 By Boucanier

By JR THORPE
May 24, 2016


How old is the meal you're eating right now? No, I'm not asking "how long has it been in the fridge;" I want to know how ancient the recipe for the food that you're consuming right now is. For some common foods, the answer is "extremely" — some of our favorite recipes have been used by human beings for thousands of years. And it isn't always the most basic foodstuffs that have the longest pedigree. Alongside staples like beer and roast boar, some of the most ancient recipes in human history involve elaborate instructions for foods like almond milk, hangover cures, and fancy cakes. This makes sense: we've always been a species that enjoys stuffing its face and passing down the knowledge about how to do it properly.

The archaeology of food is a genuine area of scholarly study, and for an understandable reason: food is the cornerstone of any human civilization, with ties to class divides, technology, crops, religion, ceremonies, and morals. So, no, that meat pie is not just a meat pie. The audience for recipes has changed radically throughout history, too; one of the oldest recipes on this list was made to be read-only by cooks for medieval nobles, while another was concealed in an abbey library for hundreds of years; food knowledge hasn't always been easily available to the masses. Now, however, you can enjoy the fruits of scholarly labor by making a 10th-century hangover stew or an 8,000-year-old pudding. They may taste faintly disgusting to your modern palate (and, considering that many of these recipes were created before modern hygiene standards, I'd not necessarily advise you to try to whip them up on your own) but hey, it's real history brewing in your crockpot.

1. Beer, 3400-2900 BC

China Photos/Getty Images News/Getty Images

The oldest beer recipe in the world was only discovered this week, but it wasn't entirely a "recipe" in the traditional sense: it was a breakdown of ingredients found in a beer-making facility uncovered in a dig site in China. Archaeologists exploring the site found brewing equipment dating back to around 3400 BC, in very early Chinese history, and sent off leftover traces from the jugs they'd found. The result? A very modern-sounding malted combination of millet, barley, Chinese pearl barley and tubers.

Ancient evidence of brewing has popped up all over the world, from Iran to Egypt — but for now, this particular facility has been crowned the oldest in human history. While the makers didn't write down their secret formula per se, you can bet a company will probably be marketing "the world's oldest beer" as soon as possible.

2. Nettle Pudding, 6000 BC

JOE KLAMAR/AFP/Getty Images

Nettles, while edible, aren't usually seen as tasty fodder, though foragers across Britain, in particular, say they're lovely as a soup or in a risotto (as long as they're prepared in some way that takes out their famous sting). But the oldest recipe in the United Kingdom, dating back 8000 years, involves them as the prime ingredient. I know, I'm not really envying ancient Britons much either.

The nettle recipe was uncovered as part of a 2007 investigation by the University of Wales Institute, which labeled it the oldest in the history of Britain: while it was only recorded in 6000 BC, it may actually be as much as two thousand years older than that. That's one hell of a pedigree for a dish that's pretty no-fuss: the researchers say it's essentially nettles boiled with barley and water. "Pudding," in this context, is used in its older sense as a savory term.

3. Meat Pie, 1700 BC

Ian Waldie/Getty Images News/Getty Images

I'm Australian, and our nation is very devoted to the art of the meat pie. So it is thoroughly unsurprising to me to know that this delicacy has been enjoyed for over three thousand years. The source for the earliest meat pie recipe comes from ancient Mesopotamia; specifically, from tablets dating to 1700 BC, which were only translated from ancient Assyrian by French academic and chef Jean Bottero in 1985.

The three tablets, which are currently held by Yale University, contain detailed recipes for stews (there's a gazelle one, if you're interested), plus the ancient pie recipe. We're not entirely sure what kinds of birds the recipe requires, but with its emphasis on the gizzards as well as the rest of the bird, it's a testament to nose-to-tail eating:

"Carefully lay out the fowls on a platter; spread over them the chopped pieces of gizzard and pluck, as well as the small sêpêtu breads which have been baked in the oven; sprinkle the whole with sauce, cover with the prepared crust and send to the table."

4. Roast Boar, 4th-5th Century AD

GREGOR FISCHER/DPA/Getty Images

This is one of the most famous ancient cookbooks in history: the De Re Coquinaria, a Roman recipe collection also called Apicius after a famous Roman gourmet. (He himself only contributed about three-fifths of the recipes, and the copies we have a date from long after his death.) It's divided into ten sections into various culinary topics, from "The Careful Housekeeper" to "The Quadruped," and contains hundreds of recipes, many of which are the earliest examples of their kind.

Along with more exotic fare for Roman audiences like roast dormouse and the liver of sows, the De Re Coquinaria contains less challenging stuff like straightforward roast boar. It tells you a lot about Roman cooking that Apicius gives two ways of cooking boar and seven different sauces to serve with it, but here's the mainstay:

"Wild boar is prepared thus: it is cleaned; sprinkled with salt and crushed cumin and thus left. The next day it is put into the oven; when done season with crushed pepper. A sauce for boar: honey broth, reduced wine, raisin wine."

5. Hangover Cure Stew, 900 AD

REMY GABALDA/AFP/Getty Images

The oldest Arabic cookbook was published in ancient Baghdad by Ibn Sayyar al-Warraq under the name The Book Of Dishes, and he didn't leave anything to chance: it contains a whopping 600 dishes for a variety of occasions. But the most famous one is the kishkiyya, otherwise known as the "hangover stew".

al-Warraq's book likely contains a lot of recipes that are older than him (he died in 961 AD), but we have no way of knowing just how ancient the kishkiyya really is. Regardless, it's full of goodness, including meat, chopped green vegetables and large amounts of herbs, and simmers into a rich broth. The full recipe is rather complicated, but if your head is aching after a night on the tiles, it likely won't hurt you.

6. Frumenty, 1381

Frumenty is one of those dishes that underpinned an entire society for ages— in this case, medieval European communities — and has since vanished without a trace. It was essentially boiled wheat cooked in almond broth with sweet flavorings and added fruit, and was eaten alongside savory dishes like meat, because the sweet/savory divide is in many ways essentially a modern invention. We have several recipes for frumenty, but the oldest dates from The Forme Of Cury, a medieval recipe collection dating back to 1381.

To the modern palate, frumenty tastes closest to porridge, and some contemporary chefs have tried to recreate the 14th century recipe for their own restaurants. If you feel inclined, you can try too, but The Forme Of Cury is maddeningly imprecise, so don't get out your kitchen scales in readiness. It's also in Middle English, so you'll need a translation:

"FOR TO MAKE FURMENTY:

Nym clene Wete and bray it in a morter wel that the holys gon al of and seyt yt til it breste and nym yt up. and lat it kele and nym fayre fresch broth and swete mylk of Almandys or swete mylk of kyne and temper yt al. and nym the yolkys of eyryn. boyle it a lityl and set yt adoun and messe yt forthe wyth fat venyson and fresh moton.

[Take clean wheat and crush it in a morter well that the hulls go all by themselves. Take fair fresh broth and milk of almonds or sweet milk of cows and temper it all. and take the yolks of eggs. Boil it a little and set it down and present it forth with fat venison and fresh mutton.]"

7. Linzer Torte, 1653

If you're looking for the oldest known confection in the world, you needn't look further than the linzer torte, a tart with jam, and a lattice pastry top. Its reputation as the most ancient of the cake recipes is down to the fact that its lineage has been traced back further than any other. It shows up not only in a 1696 recipe but in a Veronese manuscript dating back to 1653, which was found in the Admont Abbey in Austria in 2005, causing shockwaves in the admittedly small world of historical pastry.

If you want to make the exact Linzer torte of the Admont manuscript, you'll likely find something very different from the ones you'd get today. The book that broke the news, Wie mann die Linzer Dortten Macht (How To Make The Linzer Torte), explains that Linzer torte recipes have changed massively over the centuries, sometimes not even including the typical jam and lattice top. If you'd like to make one, it's probably best to stick to the version on Austria's national website.

Images: Getty; Barthélémy l'Anglais, Leo Jindrak/Wikimedia Commons

Filed Under: Historical Cooking Tagged With: cooking, Old Recipes

BBQ Is An Event

May 5, 2020 By Boucanier Leave a Comment

USO WARRIOR CENTER BBQTo me, barbecue is not a cuisine, it’s an event and I’ll explain that to you and I’ll explain what that means. So many people that I’ve run across always talk about recipes or they show recipes and to me, I’ve developed recipes, I’ve been cooking for a very long time, and it’s not about the recipe, it’s about the event. It’s about when you’re outside doing a barbecue, what is the emotion that’s being created? What are the bonds that are being created? What are the memories that keep coming back from previous barbecues? That’s what barbecue is.

Recipes are simply a means to get to that point. They aren’t the end. The end is being at that point, being at that point of happiness, of love, of openness, and I can prove that to you because I have traveled to the largest American hospital outside of the U.S., which is in Landstuhl, Germany for four years, twice a year and unbeknownst to me, because I just wanted to go there and support our troops. I just can’t think of anything greater than that because without the military, without those troops, we’d have no freedoms.

I started doing that and what I found out about the third trip because I would try and get there somewhere around Christmas, somewhere around the Fourth of July, something that meant to people as a whole and to America, and about the third trip when I got there, a general actually and an officer of the clergy came up to me and said, “Hey Pat, these barbecues are helping and ministering to these kids far beyond what you realize”? They said for months and months afterward, they still talk about them.

What it was and what the clergy explained to me was that a barbecue is about family, it’s about love, it’s a gathering, it’s about oneness, it’s about camaraderie. I would see these kids when I first got there, and it would take about four or five days to put it together, not including the weeks prior to getting there, but I would see these kids that are wounded, missing limbs, missing body parts, PTSD, and psych wards, and they were forlorn. They were really into their world, they weren’t relating a whole lot to anybody, some of their closest friends maybe, but as I included them in helping make these barbecues a success, which I purchased a number of smokers there and donated them to the USO Warrior Center and also to The Fisher House, which was the very first barbecue, ... I included them, I saw them change.

I saw them slowly but surely opening up to each other because they had to work kind of together and smiling, and the day of the barbecue was a completely different scene than when I first got there. These kids were talking, smiling, happy, playing in a dunk tank that was provided for them for the barbecues. I mean, it was unreal and that’s all I wanted to do was bring a taste of home to these men and women, and even at that point, I didn’t know what was really happening until it was explained to me. A special Thanks goes out to American Legion Post GR01 for opening the doors to make this all happen

That’s why barbecue is not a cuisine, it’s an event and everything that I’ve tried to do since then is make every time I cook, when I had my shacks, mobile units and restaurant, when I did catering, was to make it an event. To make it something that was a talking point, that brought people together, that allowed them to open up and bond with each other. I think I was pretty successful at it.

Filed Under: BBQ for Wounded, Historical Cooking Tagged With: BBQ, Fundraiser, Texas Style

  • « Go to Previous Page
  • Go to page 1
  • Go to page 2
  • Go to page 3
  • Go to page 4
  • Go to Next Page »

Copyright © 2023 · TaTu BBQ · All Rights Reserved